PayU Brazil
API Version
Minimum required API version: 1.1.0
The following features require an API version higher than the minimum:
- 3DS 2.0 External requires API version 1.3.0
Payment Methods
The following table lists all supported payment methods.
| Payment Method | Payment Method Type | Notes |
|---|---|---|
| American Express | Cards | |
| BOLETO BANCARIO | Cash | |
| DINERS | Cards | |
| Elo | Cards | This is a local card vendor. |
| Google Pay | eWallet | |
| Hipercard | Cards | This is a local card vendor. |
| MASTERCARD | Cards | |
| PIX | Bank Transfer | |
| VISA | Cards |
Currencies
BRL, USD
Features
The following table provides an overview of all supported and non-supported features.
| Feature | Supported | Notes |
|---|---|---|
 to authorize a card using 3DSecure, then you can pass the 3DS data returned from the MPI in your PaymentsOS transaction requests") 3DS 2.0 External 3DS 2.0 External | Yes | |
| 3DS 2.0 PaymentsOS-handled | Yes | Supported flow type: Provider-handled Flow. For more information, see 3DS 2 PaymentsOS-handled Flow. |
| 3DS 2.0 Provider-handled | Yes | |
| 3DS 2.0 Self-handled | Yes | |
| Installments | Yes | |
| Level 2 and 3 Data | No | |
| Multi-seller Payments | No | |
| Network Tokens | Yes | |
| Payment Facilitator | Yes | |
| PayU Risk | Yes | |
| Pre-authorization | No | |
| Retrieve Supported Payment Methods | No | |
| Retrieve Supported Plans | No | |
| Statement Soft Descriptor | Yes | |
| Stored Credentials Flag | No | |
| Transaction Processing without CVV | Yes |
Requests
Note
The PaymentsOS test environment only supports Authorize and Capture requests (this is a limitation of the PayU Latam sandbox environment).The following table lists all supported requests. Use the bodybuilder to create a sample request body for each request type.
| Request | Partial/Multiple | Mode | Notes |
|---|---|---|---|
| Authorize | Partial and multiple are not supported | Asynchronous or Synchronous |
|
| Capture | Both partial and multiple are supported | Asynchronous or Synchronous |
|
| Charge | Not Applicable | Asynchronous or Synchronous | The request can be synchronous or asynchronous, depending on your setup. |
| Refund | Partial is supported | Asynchronous | Partial refund is only supported for the following payment methods: VISA, MASTERCARD, AMEX, DINERS. |
| Void | Both partial and multiple are supported | Asynchronous | To support multiple and partial, you must enable multiple captures in your provider configuration. For more information, see Configuring Multiple Partial Captures. |
| Request | Partial/Multiple | Mode |
|---|---|---|
| Charge | Not Applicable | Asynchronous |
| Request | Partial/Multiple | Mode |
|---|---|---|
| Charge | Not Applicable | Asynchronous |
| Refund | Partial is supported | Asynchronous |
| Request | Partial/Multiple | Mode |
|---|---|---|
| Charge | Not Applicable |
Partial Refund Limitations
While partial refunds are supported, the following limitations apply:
-
You can send any amount for the partial refund as long as the value doesn’t exceed the initial or actual amount.
-
You can send as many as partial refund request as you require. The sum of the partial refund amounts cannot not exceed the total value of the transaction.
-
A partial refund request will always get a status of
pendingin the response. Partial refunds are processed manually by a PayU representative. The refund may take 2 to 6 calendar days to be processed. Once done, depending on the acquirer, the amount will appear in the extract in the next 1 to 30 days after the partial refund is processed. -
If a partial refund is pending or is being processed, you cannot send a new request until the last one is processed.
Setup Procedures
Creating a Provider Configuration
When creating a new provider configuration in the PaymentsOS Control Center, select PayU Latam as the provider.The following table lists the setup procedures that are specific to this provider.
| Configuration | Required/Optional |
|---|---|
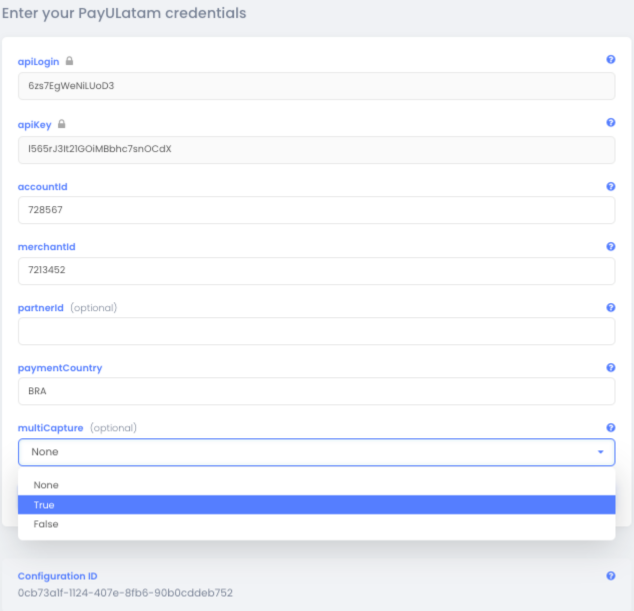
In the PaymentsOS Control Center, configure the following credentials:
| Required |
| In the PaymentsOS Control Center, create webhooks to be notified when a transaction changes its status. Notes:
| Required |
| In your PayU Brazil account, enable the validate unique. This will validate that each payment reference sent to the PayU Latam system is unique. | Required |
| In your PayU Brazil account, enable asynchronous refunds (refunds will initially have a status of pending) | Required |
| In your PayU Brazil account, enable refund notifications. Make sure to include the transaction_type field in the notification (this step is required for PaymentsOS to remain in sync with the refund status). | Required |
| In your PayU Brazil account, enable the 'Process without a cvv2 security code' feature if you intend to use it. | Optional |
| Contact PayU Latam Support to get a list of the minimum payment amounts required by the payment methods that you intend to use. To avoid unnecessary request failures, we recommend that you include some 'minimum value' validation for the transaction payment.amount in your system. | Optional |
| Enable multiple captures in your provider configuration. For more information, see Configuring Multiple Partial Captures. | Optional |
Integration Procedures
The following sections list the integration procedures that are specific to this provider.
Enabling 3DS
Note
3DS must be implemented as part of a redirection flow. For an overview of how to implement a redirection flow, see Implementing a Redirection Flow.Merchants using PayU Latam can implement 3D Secure authentication to verify shoppers' identities and reduce fraudulent transactions. To indicate that a 3DS flow should be invoked, include a provider_specific_data object with an is3ds value in your Create Authorization or Create Charge API requests.
"merchant_site_url": "http://www.abc.com/return-url",
"provider_specific_data": {
    "payulatam": {
      "additional_details": {
        "is3ds": "true"
      }
    }
  }
You can pass one of the following is3ds values:
-
"true": 3DS will always be invoked -
"false": 3DS will never be invoked -
"": If you leave this field empty PayU Latam will determine whether to invoke 3DS based on your account configuration and fraud analysis results.
Note
- Omitting the
is3dsparameter entirely from your API request will have the same effect as setting it to""(empty string) - PayU Latam’s system will evaluate the transaction using fraud analysis results and your account settings to determine whether 3DS is necessary. - In case of a MIT (merchant-initiated transactions) for subscriptions or recurrences, the
is3DSindicator should always be"false".
When implementing 3DS, you must include a merchant_site_url in your Create Authorization or Create Charge request. When the shopper completes the 3DS authentication, they will be redirected to this URL with additional parameters containing transaction information. When a 3DS flow is initiated, the response will include:
-
A
provider_dataobject with the 3DSresponse_codeanddescription -
A
redirectionobject with the link to the bank site where the shopper will complete the 3DS authentication
Here’s a sample 3DS response:
{
 "provider_data": {
        "provider_name": "PayULatam",
        "response_code": "PENDING_THREEDS_CALLBACK",
        "description": "Awaiting 3DS callback",
        "raw_response": "{}"
 },
 "redirection": {
        "created": "1739446823717",
        "merchant_site_url": "http://www.abc.com/return-url",
        "url": "https:gotothebank/redirectPost.do?PayUReference=44469235032811"
 }
}
When redirecting the shopper back to the merchant’s site, PaymentsOS will extend the merchant_site_url with the following parameters: payment_id, authorization_id or charge_id, and the authorization status:
<merchant_site_url>?payment_id=dd1fbe34-4636-4a61-8cb1-27ac8a175284&authorization_id=aec1c306-e0f7-452b-8fb5-5b34489e9d10&status=Succeed
Handling the Charge Request Response for Cash Transactions
If the charge request is successful, then the provider will return a charge response containing:
- A
statusofpending. - The expiration date of the Payment Receipt.
- A
provider_data.documentobject with href links to the Payment Receipt in HTML format and possibly the Payment Receipt in PDF format.
Note that the provider_data.additional_information field may contain a barcode, for receipt tracking purposes.
Now direct your customer to one, or both of the transaction payment receipts, so that they can print the receipt. Your customer should then take the payment receipt to the relevant Payment Office and pay for their purchase, before the expiration date.
When the provider notifies us that your customer has paid, we will update the transaction status. If no payment notification is received by the expiration date then the transaction will be considered as failed.
Implementing the PIX Payment Method Flow
PIX is an online payment transfer method released in November 2020 by the Brazilian Central Bank (Banco Central do Brasil - BACEN). It allows shoppers to make instant transfers quickly and securely.
To implement a PIX payment flow, invoke a Create Payment request followed by a Create Charge request (nothing new here). Use the BodyBuilder to generate a sample request, showing all required and optional fields (just make sure to choose the Bank Transfer payment type, select PayU Brazil and choose the PIX payment method).
Beware that the status of the transaction will remain Pending until the shopper completes the transactions on the bank site. You should register a Webhook event to receive changes to the transaction status.
Presenting shoppers with the PIX QR Code
When a shopper wants to pay with PIX, they need to scan a QR code to complete the payment. To display the QR code, you have two options:
Construct a payment page yourself
Fetch the information from the response of the Create Charge request. The relevant information will appear under the provider_data.qrcode_payment object and will include the following fields:
expiration_date: The date on which the QR code expires. A shopper can no longer pay with the QR code after this date.qrcode_data: QR code data that a shopper can copy and paste directly into their browser. This allows shoppers who cannot scan the QR code image, to still use the QR code to complete the payment.qrcode_image: The Base64 encoded QR image to render and show to your shopper.
Here’s a sample Create Charge response, showing the provider_data.qrcode_payment object:
{
  ...
  "provider_data": {
    "qrcode_payment": {
        "expiration_date": "1627488070000",
        "qrcode_data": "00020101021126950014BR...",
        "qrcode_image": "iVBORw0KGgoAAAANSUhEUgAAAPoAAAD6AQAAAACgl2eQAAA..."
    }
  }
  ...
}
Redirect the shopper to our hosted payment page
If you choose to use our hosted page, you can fetch the page’s URL from the provider_data.documents object, under the href field. This object will appear under the response of the Create Charge request and will include the following fields:
{
  ...
 "provider_data.documents": {
    "descriptor": "invoice",
    "content_type": "html",
    "href": "https://sandbox.checkout.payulatam.com/ppp-web-gateway-payu/app/v2?vid=2147657057Yea42cfd5e3f0413Yddb7b53eb648ba7"
  }
  ...
}
Handling Refunds with PIX
When handling refunds with PIX, the following applies:
-
A refund must be initiated between 10 minutes and 90 days after the original transaction was approved.
-
If the refund is approved, the funds are returned to the shopper immediately.
-
Mutliple refunds are not supported
Integrating Google Pay™
Note
If you use Google Pay, you must comply with the Google Pay API Acceptable Use Policy and accept the terms and conditions set forth in the Google Pay API Terms of Service.Integrating Google Pay involves the following:
-
Adding Google Pay to your checkout page.
-
Integrating Google Pay with your PaymentsOS transaction flows.
Adding Google Pay to your Checkout Page
Start by adding Google Pay to your checkout page, as explained in the following documentation:
- Google developer documentation.
- API integration checklist
- Brand guidelines published on the Google developer documentation site.
When you add Google Pay to your checkout page, you will also create a script to allow Google to encrypt the information for the card selected by the payer for secure processing. The gateway parameter in the script should have a constant value of payulatam, and the gatewayMerchantId should contain your PayU account number. Here’s an example:
const tokenizationSpecification = {
  type: 'PAYMENT_GATEWAY',
  parameters: {
    'gateway': 'payulatam',
    'gatewayMerchantId': 'YOUR_ACCOUNT_ID '
  }
};
Note that PayU, as the processor of Google Pay payments, supports all types of payment cards issued by Visa and Mastercard. Therefore, you should instruct the Google script to use the following allowedCardNetworks and allowedCardAuthMethods:
const allowedCardNetworks = ["MASTERCARD", "VISA", “ELECTRON”, “MAESTRO];
const allowedCardAuthMethods = ["PAN_ONLY", "CRYPTOGRAM_3DS"];
Now proceed to integrate Google Pay with PaymentsOS.
Integrating Google Pay with PaymentsOS
Once you’ve added Google Pay to your checkout page, you are ready to integrate Google Pay with PaymentsOS. Proceed as follows:
- When the customer chooses to pay with Google Pay, grab the token that Google returns to your web page from
tokenizationData.tokenand grab the card network name frompaymentMethodData.cardNetwork. Here’s a sample response from Google:
{
  "apiVersion": 2,
  "apiVersionMinor": 0,
  "paymentMethodData": {
    "description": "Visa •••• 9792",
    "info": {
      "assuranceDetails": {
        "accountVerified": true,
        "cardHolderAuthenticated": false
      },
      "cardDetails": "9792",
      "cardNetwork": "VISA"
    },
    "tokenizationData": {
      "token": "{\"signature\":\"MEUCIBuuToFwppW6YXcxf47WrBKfkXwhXXF01m/tb/fsjT7PAiEA/qjWfL3STHfJgIPkWgXqCPSKrh/jCqEAmkKUj0plQT0\\u003d\",\"intermediateSigningKey\":{\"signedKey\":\"{\\\"keyValue\\\":\\\"MFkwEwYHKoZIzj0CAQYIKoZIzj0DAQcDQgAE8vUyahj3Dg9J496cv7ML7+BRf61lgEE2TJqCeul7y+icQ2q0vzACDGeNVlY/YWCLnlX/vWNnBOeGUk6+g1tdkQ\\\\u003d\\\\u003d\\\",\\\"keyExpiration\\\":\\\"1706759255632\\\"}\",\"signatures\":[\"MEQCIGqB2pW8+5L8i9GqE/TxDNIOxgt5u8yrKp8zadC7Kw3zAiAMlv8YEVOGz+jp+TlsmW4JiW7YV4t0CLkevyha34LPPw\\u003d\\u003d\"]},\"protocolVersion\":\"ECv2\",\"signedMessage\":\"{\\\"encryptedMessage\\\":\\\"iQaWYUOWRUod96OCqcz0jWU2d0fuf1Og0NNoeqGLOEF1pug4Gq2itU1yaWj9FMvjTryBeBfAA00w0L2uIezjWkTajb5Dfy2hXgiiwUfJjDNZXwVQfUKvzHM0WmX/kWsEx8NcnuWrgk+4XZOZuvF+HRUmMiyZH7kF204jE8rmPdQiIxdAQC0NE/iyXWnEW5AH/7+ltpdXmDZnElf6Pbh5gPe/bF6bo9JiNuvun6QkII1VwtxU3wz6MqlBWY5GSk4Am3sCU7PWzUKh/k3eeMEEhyZjxVVb/PGjqY6pYcsL2I57PnplWLkrvCvg7X7ycWAzWAGdqyv+8U/AjBl8jcPffVT7URfSqHhhbaXB+0F2PIhiYYhHyP1TrIJbHVMEMNK4EDOOerKfjg7zGk2/3V9AFLHZkBon7CCwfw7GTASRqzu//8vm57VPETJJczPmGubFQB/vJigR8gufJJt8KDYOEe/QMsPWhIpyg+0r6YlNO4cSX7nG4eotQcQYKFTc9UtDpdk44ZipdkGzY++U8PawREe3qy4QE2X9q2cYWXdxKiyQxV8rrP2NuTFBxFaPBKHu5XG1agca\\\",\\\"ephemeralPublicKey\\\":\\\"BMVxybvdkSOBQbUwmKfgJcgIZBdAKCGjeeEMGyxcv6G+7xRr+Ifzh+Zrj07RnRLnCAjqnxzpD+OaNMLtYl7Y8rA\\\\u003d\\\",\\\"tag\\\":\\\"331LwnejlJHo1nONzei7fYqEUjFFGiWEXlYGZXY0HG0\\\\u003d\\\"}\"}",
      "type": "PAYMENT_GATEWAY"
    },
    "type": "CARD"
  }
}
- Pass the token in the
payment_method.additional_details.googlepay_tokenfield of the Create Charge request. Also pass the card holder name in thepayment_method.additional_details.creditcard_namefield, and pass the card network name in thepayment_method.additional_details.card_networkfield. Here’s a sample request body (notice that the Google Pay token value must be passed as astring):
{
  "payment_method": {
    "source_type": "ewallet",
    "type": "untokenized",
    "vendor": "googlepay",
    "additional_details": {
      "card_network" : "MASTERCARD",
      "creditcard_name": "Nhoj Atlovart",
      "googlepay_token": "{\"signature\":\"MEUCIQCwQu3vBAe9YTgaFU+\/TAlCBF7\/ssCUoNh\/jqLMZ694aAIgIKqTbiDhZH05V3EXmeZNjqloTUbpo4aC753Kkqz9sLo\\u003d\",\"intermediateSigningKey\":{\"signedKey\":\"{\\\"keyValue\\\":\\\"MFkwEwYHKoZIzj0CAQYIKoZIzj0DAQcDQgAEHb3\/4WkpiP5IfynAS7dHdgpB2jIjgkaAvBWMHS4rg63H6C0Y3zAshWzUW45j2LCzjQ4JeXGcHZn9suXJJuHdbA\\\\u003d\\\\u003d\\\"...}"
    }
  }
}
Configuring Multiple Partial Captures
Suppose your acquirer does not support multiple partial captures, yet your business model requires you to invoke multiple capture requests for a single transaction. You can configure this functionality via your PaymentsOS account (Account > Providers) and choose ‘true’ from the drop-down menu of the ‘multiCapture’ field, like so:
After activating this functionality, you will need to invoke separate capture request for every partial-capture you perform or separate void requests in case an item is out of the stock. We will submit a final capture request on your behalf for the sum of all of these partial captures when the total sum of your partial captures and voids reaches the full authorization amount, or if the capture time frame has timed out.
A few things to note:
- A transaction’s initial status will always be
pendingand will remainpendinguntil we invoke the final capture request. The transaction status will change according to the provider’s response, to reflect its new status (i.e., it will change to eithersucceedorfailed). - When a transaction status changes to either
succeedorfailed, you will receive webhook notifications with the final statuses of each of the partial capture requests or partial void requests you invoked (e.g., if you invoked five capture requests, you will receive five webhooks). - Time limitation: Acquirers limit the time allotted to invoke a final capture request. We send the final capture request after five days to comply with these limitations.
- If the total amount of the partial captures you invoked doesn’t equal the original authorization amount, we pass the partial amount for the acquirer’s approval after five days.
- When you send a void request with no previous capture requests - though the sum still equals the original authorization amount - we call the provider with a void request to release the money back to the shopper’s account.
Errors in a Redirection Flow
In a redirection flow, customers finalize a transaction on a third-party site and are then directed back to your web page (the merchant_site_url) where you inform them of the status of their payment. Of course, there’s always a chance of an unexpected error (such as a provider communication timeout) in this process. If an error does occur, we’ll let you know about it by appending the type of error (api_error or provider_error) to the merchant_site_url. If available, we will also include the ID of the original payment request and related transaction request (action).
Here’s an example.
<merchant_site_url>?error=api_error&payment_id=dd1fbe34-4636-4a61-8cb1-27ac8a175284
&action_id=f7cdc75d-68d3-4a0b-b6ae-39c5a9a2cbcb/
Testing
Follow the steps in the PayU integration testing page.
To test requests in the PayU Latam sandbox environment, make sure your account has been configured to operate in test mode. You can then simulate specific response statuses for each request type, as listed below.
For Authorization and Charge Requests:
-
To simulate a status of
Succeed, pass in"holder_name": "APPROVED"in the Create Token request. -
To simulate a status of
Pending, pass in"holder_name": "PENDING_TRANSACTION_REVIEW"in the Create Token request. -
To simulate a status of
Failed, pass in"holder_name": "REJECTED"in the Create Token request.
Not passing a CVV code?
If do not pass a CVV code in the request (provider_specific_data.payu_latam.process_without_cvv2: true), then you also need to pass an expiration date where MM <= 06 and YYYY != 2022 to simulate a status of Succeed, in addition to the holder_name values listed above. When simulating a status of Failed, MM must be > 07.
For Capture, Refund and Void requests:
-
To simulate a successful Capture request, first initiate a successful Authorization request.
-
To simulate a successful Refund request, first initiate a successful Charge or Capture request.
-
To simulate a successful Void request, first initiate a successful Authorization request.
Simulating a Request Timeout
Note
You can only simulate a timeout request, if you do not pass a CVV code in the request (provider_specific_data.payu_latam.process_without_cvv2: true)
To simulate a request timeout, invoke the Create Token request and pass an expiration_date with a format of MM/2022, where MM is the delay in seconds. The month (MM) can be any value between 01 (10 seconds) and 05 (50 seconds).
Test Cards
You can use the following cards for testing:
| Card | Number |
|---|---|
| AMEX Credit Card | 376611000000000 |
| DINERS Credit Card | 36213800000009 |
| ELO Credit Card | 5067310000000002 |
| HIPERCARD Credit Card | 6062820000000003 |
| MASTER Credit Card | 5123740000000002 |
| VISA Credit Card | 4422120000000008 - 4984460000000008 |