Using the Secure Fields Form
When using the Secure Fields Form, PaymentsOS generates the card details input fields and handles the logic of grabbing the card information submitted by the user. This option further reduces your PCI scope compared to the JavaScript API, requiring you to be SAQ A compliant.
Version Information
This topic describes the latest version of the Secure Fields Form (version 3). For information about the previous version, see Using the Secure Fields Form Version 2.
For an overview of all methods supported by the Secure Fields Form version 3, see the Secure Fields Form Reference.
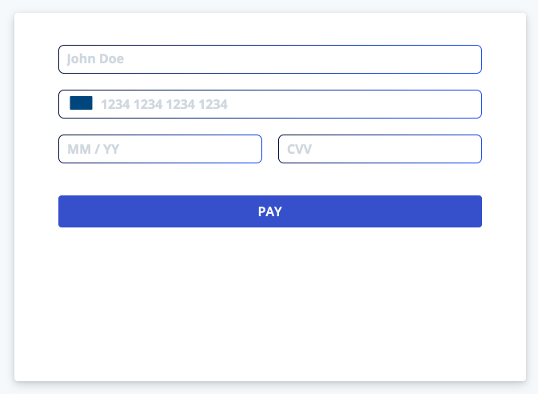
You can style the form as you desire. Here’s an example:
When card information is submitted through the Secure Fields Form, PaymentsOS returns a token representation of the card to your site. If you added additional fields to the form, then these fields are included in the token representation of the card as well. You must use the token when accepting payments.
Version Information
There are a few details you should be aware of when it comes to tokenization. What you should know about tokenization.Embedding the Secure Fields Form in a Checkout Page
The steps for embedding the Secure Fields Form in your checkout page are the following:
- Include the Secure Fields Javascript SDK in your checkout page. You can find the SDK at https://js.paymentsos.com/v3/latest/secure-fields.min.js.
<body>
  ...
  <script src="https://js.paymentsos.com/v3/latest/secure-fields.min.js"></script>
</body>
Subresource Integrity (SRI)
For enhanced security, you can use Subresource Integrity (SRI) checks with versioned SDKs instead of the ‘latest’ version. Learn more in the Using SRI.- Add a form with the input elements you want to show. The example below shows just three input fields: the card holder name, the credit card number and the card expiration date. Once you are familiar with the basic implementation steps, proceed to review the additional secure field types you can add.
<body>
  ...
    <form id="payment-form">
       <div class="field">
          <input id="cardholder-name" class="input empty" placeholder="John Doe" />
          <label>Name</label>
       </div>
       <div class="field">
          <div id="card-number" class="input empty"></div>
          <label>Card Number</label>
       </div>
       <div class="field">
          <div id="exp-date" class="input empty"></div>
          <label>Expiration Date</label>
       </div>
       <button type="submit" id="pay_button">Pay $25</button>
    </form>
 ...
</body>
- Now onto some vanilla Javascript. Create an instance of the secure fields by calling
POS.fields(publicKey,options?). As the first argument, pass your public key from your Business Unit so that you can be authenticated. As the second argument, you can pass a list of custom fonts to be applied to the fields (this is optional).
/*
Create an instance of the secure fields. Pass the public key as the first argument.
As the second argument, we'll pass a list of custom fonts to be applied to the fields (this is optional).
*/
const fonts = [
  {
    src: 'https://fonts.googleapis.com/css?family=Source+Code+Pro',
  }
]
const formElements = new POS.Fields("99346d84-5187-4221-9c16-dc51a8de27fa", {
  fonts
})
- Create an instance of each field you want to show in your form, by calling
formElements.create(elementType,options?)with the type of field you want to instantiate and any additional options you want pass in. Then mount each field to the DOM.
/*
The placeholders object is just one example of an additional option you can pass when instantiating a field.
*/
const placeholders = {
    cardNumber: '1234 1234 1234 1234',
    expDate: 'MM / YY'
}

// Instantiate the fields you want to show and mount them to the DOM.
const cardNumber = formElements.create('cardNumber', {
    placeholders
})
cardNumber.mount('#card-number')

const expiry = formElements.create('creditCardExpiry', {
    placeholders
})
expiry.mount('#exp-date')
- Create a token by calling POS.createToken(elementType,additionalData) when the user submits the form, but not until we fetched the card holder’s name so that we can pass it in an additional data object to the POS.createToken(elementType,additionalData) call (the card holder name is a required field, so you cannot skip this step).
document.getElementById('payment-form').addEventListener('submit', async(event) => {
    event.preventDefault()
    const additionalData = {
        holder_name: document.getElementById('cardholder-name').value // This field is mandatory
    }
    const result = await POS.createToken(cardNumber, {
        additionalData,
        environment: 'test' // Set the PaymentsOS environment you're connecting to
    })
    console.log(`The response is ${JSON.stringify(result)}`)
})
Let’s piece it all together:
    <body>
      <div class="checkout-page">
          <form id="payment-form">
            <div class="field">
                <input id="cardholder-name" class="input empty" placeholder="John Doe" />
                <label>Name</label>
            </div>
            <div class="field">
                <div id="card-number" class="input empty"></div>
                <label>Card Number</label>
            </div>
            <div class="field">
                <div id="exp-date" class="input empty"></div>
                <label>Expiration Date</label>
            </div>
            <button type="submit" id="pay_button">Pay $25</button>
          </form>
      </div>
      <script src="https://js.paymentsos.com/v3/latest/secure-fields.min.js"></script>
      <script src="index.js"></script>
    </body>
    // This is our index.js file

    /*
    Create an instance of the secure fields. Pass the public key as the first argument.
    As the second argument, we'll pass a list of custom fonts to be applied to the fields (this is optional).
    */
    const fonts = [
      {
        src: 'https://fonts.googleapis.com/css?family=Source+Code+Pro',
      }
    ]
    const formElements = new POS.Fields("99346d84-5187-4221-9c16-dc51a8de27fa", {
      fonts
    })


    /*
    Create an object holding additional options that you can pass to the constructor for instantiating
    the credit card and card expiry fields.
    There are lots of other options available that you can pass to the constructor,
    but to keep it simple we'll just show this one object in our example.
    */
    const placeholders = {
        cardNumber: '1234 1234 1234 1234',
        expDate: 'MM / YY'
    }

    // Instantiate the fields you want to show and mount them to the DOM.
    const cardNumber = formElements.create('cardNumber', {
        placeholders
    })
    cardNumber.mount('#card-number')

    const expiry = formElements.create('creditCardExpiry', {
        placeholders
    })
    expiry.mount('#exp-date')

    /*
    Create a token when the user submits the form, but not until we fetched the card holder's name
    so that we can pass it in an additional data object to the createToken call.
    */
    document.getElementById('payment-form').addEventListener('submit', async(event) => {
        event.preventDefault()
        const additionalData = {
            holder_name: document.getElementById('cardholder-name').value // This field is mandatory
        }
        const result = await POS.createToken(cardNumber, {
            additionalData,
            environment: 'test' // Set the PaymentsOS environment you're connecting to
        })
        console.log(`The response is ${JSON.stringify(result)}`)
    })
Additional Errors
Under the hood, the Secure Fields Form invokes the Create Token API. If the Create Token API returns an error, then no token is created and you will receive the error in the response of the POS.createToken(elementType,additionalData) call.Secure Field Instantiation Options
When instantiating the secure fields using POS.fields(publicKey,options?), there are several options you can pass. These include a list of custom fonts, or the option to disable the luhn check done on a card number. For a list of available options, see the Secure Fields API reference.
Secure Field Types and Options
When walking you through the steps required to embed the Secure Fields Form in a checkout page, we settled for a bare-bones example that showed you how to instantiate the credit card number and the card expiration date fields. You’re not limited however to just those two field types. For an overview of all available types, see the Form Elements (Fields) reference.
Options for Instantiating Fields
Recall that you instantiate a field using formElements.create(elementType,options?). The second argument to this call is an object holding additional options, such as a placeholder for the card number:
const placeholders = {
    cardNumber: '1234 1234 1234 1234'
}

const cardNumber = formElements.create('cardNumber', {
    placeholders
})
There are more options you can choose from, however. For an overview of all available options, see the Form Elements (Fields) reference.
Validating User Input
The Secure Fields Form provides event listeners for events that are triggered when the value of an input field has been changed, if the field gets focus or if the field loses focus. They are called like so:
cardNumber.on('change', (event) => {
    console.log(event)
})

cardNumber.on('focus', (event) => {
    console.log(event)
})

cardNumber.on('blur', (event) => {
    console.log(event)
})
The event parameter of the callback function will return the following object (values are examples):
{
  bin: "510510", // the card's BIN
  complete: false, // wether the card data is inserted and valid
  brand: "visa", // only returned for card numbers
  empty: false, // whether the input field is empty
  error: undefined // an error object if an error occurred on input
}
If an error occurred, its object will look like this (values are examples):
{
  "cvv": "wrong length",
  "pan": "not luhn",
  "expiry": "passed"
}
Additional Methods
The are some additional methods that you can use on each type of input field (see the Form Elements (Fields) reference for a list of all available field types). Those methods are listed below.
| Method | Description |
|---|---|
| update(optionsObject) | Updates the input field with the specified options. See the Form Elements (Fields) reference for a list of options you can pass. |
| clear() | Clears the input field |
| destroy() | Unmounts the input field from the DOM. You can call this method only once. |
Styling the Secure Fields Form
You can style the secure fields by passing style or classes objects to the formElements.create(elementType,options?) call. The style object allows you to style the secure fields based on their state (valid input, no input or invalid input). The classes object allows you to apply custom classes to the div elements wrapping the input fields, giving you even more control over the styles that you can apply to the fields. Let’s take a look at both.
Applying Styles
Jump to the Style Objects Reference
The style object has nested objects, whose keys are the names of the input status (valid input, no input or invalid input) that a field can have. The exception is the nested base object; this object has styles that are inherited by the other objects. Here’s a basic example, with a base object and an invalid object holding styles to be applied if the user input is invalid:
const style = {
    base: {
        color: '#fff',
        fontWeight: 600,
        fontFamily: 'Quicksand, Open Sans, Segoe UI, sans-serif',
        fontSize: '16px',
        fontSmoothing: 'antialiased'
    },
    invalid: {
        color: '#FF0000'
    }
};
You can also add pseudo-classes and pseudo-elements for even more granular control over how the elements are styled:
const style = {
    base: {
        color: '#fff',
        fontWeight: 600,
        fontFamily: 'Quicksand, Open Sans, Segoe UI, sans-serif',
        fontSize: '16px',
        fontSmoothing: 'antialiased',
        ':focus': {
            color: '#424770',
        },

        '::placeholder': {
            color: '#9BACC8',
        },

        ':focus::placeholder': {
            color: '#CFD7DF',
        },
    },
    invalid: {
        color: '#FF0000',
        ':focus': {
            color: '#FA755A',
        },
        '::placeholder': {
            color: '#FFCCA5',
        },
    }
};
When you’re done styling, pass the style object to the formElements.create(elementType,options?) call like so:
const cardNumber = formElements.create('cardNumber', {
    style,
    ...
})
Applying Custom Classes
Jump to the Classes Object Reference
The classes object allows you to apply custom classes to the div elements wrapping the input fields, according to the input status (valid input, no input, invalid input or has focus) that a field can have. The classes object’s keys are the names of each type of input status. In the example below, we apply the my-own-invalid-class class to the input field if the user enters some invalid input.
const classes = {
    invalid: 'my-own-invalid-class'
}
Note
Thediv element to which the classes are applied, is the element you pass to the formElement.mount(containerSelector) call.
If you do not pass a classes object, then default class names are applied (see the Classes Object Reference for an overview of the default class names).
When you’re done styling, pass the classes object to the formElements.create(elementType,options?) call like so:
const cardNumber = formElements.create('cardNumber', {
    classes,
    ...
})
What’s next?
Now that you’ve collected your customer’s card information, proceed to accept a payment.
Using the Secure Fields Form Version 2
Version Information
This topic describes an older version (2.x) of the Secure Fields Form. For information about the latest version (3.x), see Using the Secure Fields Form.
For an overview of all methods supported by the Secure Fields Form version 2.x, see the Secure Fields Form Reference.
The Secure Fields Form is an HTML form that you can include in your site to collect a user’s card information. When using this option, PaymentsOS generates the card details input fields and handles the logic of grabbing the card information submitted by the user. This option further reduces your PCI scope compared to the JavaScript API, requiring you to be SAQ A compliant.
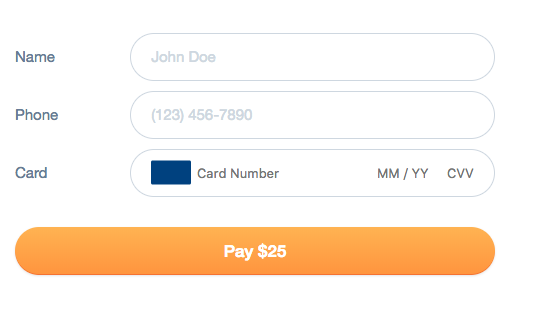
You can style the form as you desire. Here’s an example:
When card information is submitted through the Secure Fields Form, PaymentsOS returns a token representation of the card to your site. If you added additional fields to the form, then these fields are included in the token representation of the card as well. You must use the token when accepting payments.
Version Information
There are a few details you should be aware of when it comes to tokenization. What you should know about tokenization.Embedding the Secure Fields Form in your Site
To get started, include the Secure Fields Javascript SDK in your checkout page. You can find the SDK at https://js.paymentsos.com/v2/latest/secure-fields.min.js. Also provide your public key to authenticate yourself by calling POS.setPublicKey().
<body>
  <script language="JavaScript" type="text/javascript" src="https://js.paymentsos.com/v2/latest/secure-fields.min.js"></script>
  <script>POS.setPublicKey("99346d84-5186-4221-9c16-dc51a8de27fb");
  </script>
  ...
</body>
Note
There are a few details you should be aware of when it comes to tokenization. What you should know about tokenization.Now embed the Secure Fields form and set your environment (either “test” or “live”) by calling POS.setEnvironment(). Then display the form’s fields by calling POS.initSecureFields(). As a last step, attach a click event to the form that is invoked when the form is submitted. Pass the event a function that will send the card information to PaymentsOS, tokenize the information and return the token to your site.
<body>
  ...
  <!-- Embed the form after loading the Secure Fields Javascript SDK and setting your public key -->
  <form id="payment-form">
    <input type="text" id="cardholder-name" placeholder="John Doe" />
    <div id="card-secure-fields">
      <!-- The payment form will be displayed here -->
    </div>
    <button type=”submit”>Pay</button>
  </form>

  <!-- After embedding the form, set your environment, initialize the form's fields
   and send the data to PaymentsOS when the form is submitted -->
  <script>

    // Set your environment. Values are either "test" or "live".
    // If omitted, the test environment will be used.
    POS.setEnvironment("test");

    // Initialize the form's fields
    POS.initSecureFields('card-secure-fields');

    // Attach a click event to the form that is invoked when the
    // form is submitted. On submit, pass the card information to
    // PaymentsOS and receive the token representing the card
    // information in your site.
    document.getElementById('payment-form').addEventListener('submit', function(event) {
      event.preventDefault();
      const additionalData = {
        holder_name: document.getElementById('cardholder-name').value // This field is mandatory
      }
      POS.createToken(additionalData, function(result) {

        // Grab the token here

      });
    });
  </script>
</body>
Note
By default, the Secure Fields Form will show input fields for the card’s number, the card’s expiration date and the card’s CVV code. You must add a field for the cardholder’s name, since this field is mandatory (the field itself is not part of the iFrame generated by PaymentsOS).Adding Additional Fields to the Form
Depending on the provider that you are transacting against, you may need to add additional fields to the form. These fields will then be included in the token representing the customer’s card.
Version Information
For a list of additional fields that can be included, see the Create Token API.To add an additional field, simply add it as an input field to the form. Then include its key and value in the additionalData object. The key must be identical to the attribute name required by the Create Token API.
Here’s an example of adding number and type fields that define a user’s identity card.
<!-- Here's our payment form-->
<form id="payment-form">
  ...
  <input type="text" id="cardholder-name" placeholder="John Doe" />

  <!-- Add the additional fields as input fields to the form -->
  <input type="text" id="idnumber" placeholder="ID Number" />
  <input type="text" id="idtype" placeholder="Passport, Driver's License" />
  <div id="card-secure-fields">
    <!-- This is where the payment form will be displayed -->
  </div>
  <button type=”submit”>Pay</button>
</form>

<script>
  // Initialize the form’s fields
  POS.initSecureFields('card-secure-fields');

  document.getElementById('payment-form').addEventListener('submit', function(event) {
        event.preventDefault();
        const additionalData = {
          holder_name: document.getElementById('cardholder-name').value,

          // Add the additional field here. In this example, we are adding
          // identity document fields. Notice that the key is identity_document and that the value
          // is of type object.
          identity_document: {
            number: document.getElementById('idnumber').value,
            type: document.getElementById('idtype').value
          }
          POS.createToken(additionalData, function(result) {

            // Grab the token here

          });
        });
</script>
Configuring Form Options
You can configure a number of options that change the form’s behavior and appearance. For example, you can disable the security code input field or disable the Luhn check for validating a card’s number. You configure these options by calling the relevant method before initializing the form’s fields. Here’s an example:
<script>
...
// Disable the security number field
POS.disableSecurityNumber();
// Now initialize the fields
POS.initSecureFields('card-secure-fields');
</script>
The following table lists the options you can configure:
| Option | Set by calling: |
|---|---|
| Disable card formatting. This options disables auto-formatting of the credit card number into groups of digits. | POS.disableCardFormatter(); |
| Disable the card image field. This option prevents the card’s image from appearing. | POS.disableCardImage(); |
| Disable the security number (cvv, cvc etc.) field. When you set this option, the security number input field will not appear on the form. | POS.disableSecurityNumber(); |
| Disable the Luhn check for validating a card’s number. | POS.disableLuhnValidation(); |
| Set the card number’s input field placeholder text. Default placeholder text is “card number”. | POS.setCardNumberPlaceholder("Your Text"); |
| Set the expiration date’s input field placeholder text. Default placeholder text is “mm / yy”. | POS.setExpirationDatePlaceholder("Date Format"); |
| Set the fields' display direction from right to left. | POS.setDirectionRtl(); |
| Set the security code’s input field placeholder text. Default placeholder text is “CVV”. | POS.setSecurityNumberPlaceholder("security code name"); |
Customizing the Form’s Look and Feel
Customizing the form’s look and feel is easy. Simply add a style constant in which you define the styles for the form’s input fields. Make sure to use camelCase for the style attributes (and not kebab-case, as you are accustomed to when writing css).
Note
You can only use thestyle constant to style the form’s default fields. If you add any additional fields to the form, you will need to provide your own css to style them.
Here’s an example. Notice that the base attributes are common to all input fields. You need to call POS.setStyle() for your changes to take effect.
<script>

  // Make sure to use camelCase for the style attributes

  const style = {
    base: { // Common to all input fields
      color: 'green',
      fontWeight: 400,
      fontSize: '13px',

      // Here you can style the span element that wraps the secure fields.
      // The default values are shown below.
      secureFields: {
        position: absolute,
        top:0
      }

      // The Primary Account Number (PAN) field is always included in the form.
      // You can style it here.
      pan: {
        fontSize: '13px'
      },

      // The expirationDate field is always included in the form.
      // You can style it here.
      expirationDate: {
        color: 'blue',
        fontSize: '13px',
        // width: '70px'
      },

      // Unless you disable the cvv field, it will be included in the form.
      // You can style it here.
      cvv: {
        color: 'red',
        fontSize: '13px',
      }
    }
  };

  // Done styling? Let us know, so that we can apply your changes.
  POS.setStyle(style);

  // Make sure to initialize the fields after setting your styles
  POS.initSecureFields('card-secure-fields');
  ...
</script>
Validation Errors
The Secure Fields Form validates that the user provided a card holder name, as well as a valid card number (if Luhn validation is enabled) and a valid card expiration date. If validation fails for one of these, an object is returned with a category value of client_validation_error, a description indicating why the validation failed as well as more_info with additional information about the error.
Depending on the error, one of the following objects may be returned:
{
  category: "client_validation_error",
  description: "Invalid PAN",
  more_info: "Card number did not pass luhn validation"
}
{
  category: "client_validation_error",
  description: "Invalid expiration date",
  more_info: "expiration date have passed"
}
{
  category: "client_validation_error",
  description: "Missing required parameters",
  more_info: "holder_name field is mandatory"
}