End to End Encryption
PaymentsOS uses the Javascript Object Signing and Encryption (JOSE) framework for managing the encryption process. JOSE is a framework intended to provide a method to securely transfer claims (such as authorization information) between parties.
Flow Overview
The image below illustrates a flow in which you encrypt a user’s card data.
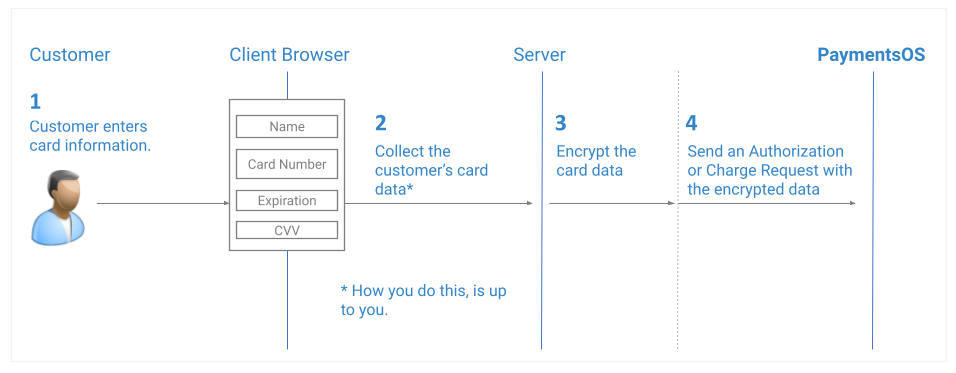
At a glance, the flow is identical to the payments flow in which you use our tokenization service when collecting a user’s card information. Looking at the flow details, however, you will notice three differences:
-
Step 2: Collect the user’s card data. Since you’re SAQ D compliant, it’s up to you to choose the best way of doing this.
-
Step 3: Use our encryption service to encrypt the user’s card data (this includes both the card number and the CVV code). To do so, you will need to generate a RSA JSON Web Key (JWK) and use its public properties to encrypt the card data. For more information, see Encrypting a User’s Card Information.
-
Step 4: Send us the encrypted data in the Create Authorization or Create Charge request.
Encrypting a User’s Card Information
The first step in encrypting a user’s card information, is to generate a RSA JSON Web Key (JWK) using the Create a new Public and Private Key Pair API request. This API generates a key pair with both public and private properties. The public properties of the JWK are included in a jwk object returned by the API request; this object represents the public key. The private properties of the JWK (representing the private key) remain secured in PaymentsOS and are never exported. Here’s a sample response, including the jwk object:
{
   "jwk":{
      "e":"AQAB",
      "n":"x2sInjG6IMHExZOqf6lMaCULlrQn696hPRRZCRxsoLKE6NycF7VMemFrmSQ9wCmsqPa-AavlAnvVrTV4nE3LAPy5sJ8bw5gqykaYY1AkzTex0PzuNmBwSb2FOUYVlVTPGv_QTQjvFqy00uVJQqwkKRPv7NFu1fXMhDh6kKFhmJd7JNbDCCj1cXHHVwglLO-0HaE9-7_Gb00ihtSNQE3L19uwBB2Y0xYvQTTCOFENeN5uX_dQOMEWKqPWlje8atjbJZ1JYbCaPyaFVsb6I2l8IrbcRGXDtPjNoF_eran3zYn9cp1MXuNIN66yCUS_LpsPH1Ey2qgY6eqI-hkx5_IK14MWau_nG7vWvOQTii-L-XogDuVZePI-Z9IwgdGFgDPGfwrRfdLuiFG90hHCQ6qTzyHMcfu-APcGtzQjMitC2sHqdF1VCayyPHCzw36iaFh-c0IzbElOxDPsslCSwxIhwPiVfcW-Hvv8MVrNg4V1W_NVbWNruoAojLMM55t7SEfpaykXqfIOVI5NVt9tydLuly5QvEQ1n8e6IplWESOrZy4mw4jGw6XbUYSgQd2REHk4yJVmE7U649dG_z4fPDbl7ftJqZFAaj1tj6Mj3jnuIsGTrq11HWl4DMO0aXp5fUnHhHMV3YcvLqehmVW7aQG3D3tqOY5bqANJW7zDimNGoKU",
      "kty":"RSA",
      "kid":"sample_1",
      "use":"enc"
   },
   "created":"string",
   "version":"1",
   "key_type":"RSA",
   "name":"sample",
   "protected_headers":{
      "kid":"sample_1",
      "enc":"A256GCM"
   }
}
Let’s take a moment to dissect part of the response data. The first attribute to notice is key_type. This represents the encryption algorithm that will be used to encrypt the card data. You specify this algorithm by passing it as a type in the request body of the Create a new Public and Private Key Pair API request. The types you can specify are RSA (resulting in a key size of 4096 bit) or EC (resulting in a key size of p-256).
Another attribute to notice is the protected_headers object:
...
 "protected_headers": {
            "kid": "sample_1",
            "enc": "A256GCM"
        }
 ...
The protected_headers is a JSON object that includes the header elements that need to be integrity protected by the signing algorithm. When encrypting a user’s card data, we expect the protected_headers object to have four attributes. Two of those are returned in the response of the Create a new Public and Private Key Pair API request (as shown in the example above):
-
kid: Allows us to identify the private key to use in order to decrypt the data before passing it on to the target provider. -
enc: Identifies the content encryption algorithm used to perform authenticated encryption on the card data to produce the encrypted result.
The other two attributes must hold the create date and expiration date of the JWE, in order to prevent replay attacks. Since the values are dynamic, you must add them to protected_headers yourself. Those attributes are:
-
iat: Short for “issued at”. Holds the created date. -
exp: Short for “expiration”. Holds the expiration date.
We’ll look at an example in a moment, just make sure to keep the following guidelines in the back of your mind:
-
The created date must be in the past; the expiration date must be in the future.
-
The difference between the created and expiration data can be maximum 10 minutes.
Now let’s take a look at a complete example of how to go about encrypting the card data.
const jose = require('jose');
const TOKEN_TTL_MIN = 10; // Used to compute the expiration date that will be added to protected_headers
const CREDIT_CARD_DATA = JSON.stringify({credit_card_number: '4111111111111111', cvv: '090'});
const JWK_KEY = {
    "jwk": {
        "e": "AQAB",
        "n": "x2sInjG6IMHExZOqf6lMaCULlrQn696hPRRZCRxsoLKE6NycF7VMemFrmSQ9wCmsqPa-AavlAnvVrTV4nE3LAPy5sJ8bw5gqykaYY1AkzTex0PzuNmBwSb2FOUYVlVTPGv_QTQjvFqy00uVJQqwkKRPv7NFu1fXMhDh6kKFhmJd7JNbDCCj1cXHHVwglLO-0HaE9-7_Gb00ihtSNQE3L19uwBB2Y0xYvQTTCOFENeN5uX_dQOMEWKqPWlje8atjbJZ1JYbCaPyaFVsb6I2l8IrbcRGXDtPjNoF_eran3zYn9cp1MXuNIN66yCUS_LpsPH1Ey2qgY6eqI-hkx5_IK14MWau_nG7vWvOQTii-L-XogDuVZePI-Z9IwgdGFgDPGfwrRfdLuiFG90hHCQ6qTzyHMcfu-APcGtzQjMitC2sHqdF1VCayyPHCzw36iaFh-c0IzbElOxDPsslCSwxIhwPiVfcW-Hvv8MVrNg4V1W_NVbWNruoAojLMM55t7SEfpaykXqfIOVI5NVt9tydLuly5QvEQ1n8e6IplWESOrZy4mw4jGw6XbUYSgQd2REHk4yJVmE7U649dG_z4fPDbl7ftJqZFAaj1tj6Mj3jnuIsGTrq11HWl4DMO0aXp5fUnHhHMV3YcvLqehmVW7aQG3D3tqOY5bqANJW7zDimNGoKU",
        "kty": "RSA",
        "kid": "sample_1",
        "use": "enc"
    },
    "created": 1684004586163,
    "version": 1,
    "key_type": "RSA",
    "name": "sample",
    "protected_headers": {
        "kid": "sample_1",
        "enc": "A256GCM"
    }
}

// Creating the date object so we can add it to protected_headers
const createdDate = new Date();
const expiredDate = new Date(createdDate);
expiredDate.setMinutes(expiredDate.getMinutes() + TOKEN_TTL_MIN);
const iat = createdDate.getTime();
const exp = expiredDate.getTime();

// Encrypting the card data
async function encrypt() {
    const rsaPublicKey = await jose.importJWK(JWK_KEY.jwk)
    const jwe = await new jose.CompactEncrypt(new TextEncoder().encode(CREDIT_CARD_DATA))
        .setProtectedHeader({
            alg: 'RSA-OAEP-256',
            enc: JWK_KEY.protected_headers.enc,
            kid: JWK_KEY.protected_headers.kid,
            iat,
            exp
        })
        .encrypt(rsaPublicKey)
    console.log(jwe)
}

encrypt();
Downloading a .pem File
If desired, you can download a Key PEM File. You can choose from one of the following formats:
-
As a file holding the public key properties. This is the default.
-
As a certificate. The certificate is self-signed by PayU as the certificate authority. You can use this certificate to validate that the certificate you downloaded is self-signed by PayU.
Note
If you choose to download the PEM file as a file holding the public key properties, you need to beware that it does not include the protectedheaders.kid and protectedheaders.enc fields. However, you do need them when encrypting the card data. So you either need to fetch them separately from the response of the Retrieve a Key by Version request, or define them yourself using the following formats:
kid: {name}_{version}enc: A256GCM
Managing Key Pairs
There are some best practices you should follow when managing your key pairs.
Key Pair Names
First, there is the key pair name which you pass when creating a new public and private key pair. This name is commonly used to reflect the name of your application, so make sure to provide a meaningful name. If you use multiple applications, the name will help you identify the key pairs you want to use.
Maximum Number of Key Pairs
You can create up to 10 key pairs.Key Pair Versions
You can create multiple versions of each key pair. Doing so is recommended, since it allows you to rotate your JWKs thereby providing an additional level of protection.
To create a new version of an existing key pair, simply specify an existing key pair name when creating a new public and private key pair. You can then use the Retrieve all Key Versions by Key Name request to retrieve all versions for a specific key pair name and use the latest version. Alternatively, use the Retrieve a Key by Version request to retrieve a specific key pair version.