3DS Authentication Service (Deprecated)
PaymentsOS provides a 3D Secure Authentication service that handles the entire 3D Secure authentication flow, with support for both 3D Secure version 1 and version 2.
On this Page
Same Great Experience, New Name!
Enjoy the same great service with a new name! Don’t worry this change won’t impact your platform experience or how you run your business.
Collect card details and accept your first payment
Collect card details and accept your first payment
Shake hands with the only heavyweight champion capable of lifting JSON
Allow customers to reuse their card information
PaymentsOS is the technology infrastructure that powers PayU Enterprise. Designed to work as a payments operating system of its own accord (hence PaymentsOS), it provides you with a comprehensive toolset for payment processing. This includes:
A single entry point for processing payment requests. Using PaymentsOS, you communicate through a single API rather than setting-up communication channels to multiple payment providers.
Functionality for dynamically routing a payment request to the most optimal payment provider. Dynamic routing is based on business rules such as fees, acceptance rates, availability and response times.
The ability to analyze your payments performance. Using the insights gained, you can then make informed decisions about tweaking your business rules to further reduce abandonment rates and card declines and improve your bottom line.
The ability to minimize your PCI compliance scope. PaymentsOS reduces the burden of PCI compliance via secure credit card collection and tokenization.
Let’s take a birds-eye view of the steps needed to integrate with PaymentsOS. Looking down on the integration landscape, you will notice a total of 4 steps: configure, develop, test and deploy to production.

Add the providers you will transact against and define the business units that will accept payments. See Setting-up PaymentsOS.
Write client-side code for collecting a customer’s card information and server-side code for handling all required transaction flows.
To start collecting card information, understand the options available to you and review the code samples for using our client-side Javascript API or Secure Fields Form. Then get a feel for implementing a one-step (Charge) payment flow by following the procedures in Accepting a Payment.
Once you are familiar with the basics of a client-side and server-side implementation, move on to read about the other payment flows and operations that we support.
Verify that your integration works as expected. As a best practice, you should configure, develop and test your integration in a development and staging environment before going live. Review our guidelines for setting up your environments and learn how to use the mock provider for running tests. We also summarized the test cases you should execute before moving to production.
This is the moment when your efforts come to fruition! So, once you’re confident that your setup and integration is production-ready, deploy your code to the production environment and start live transactions.
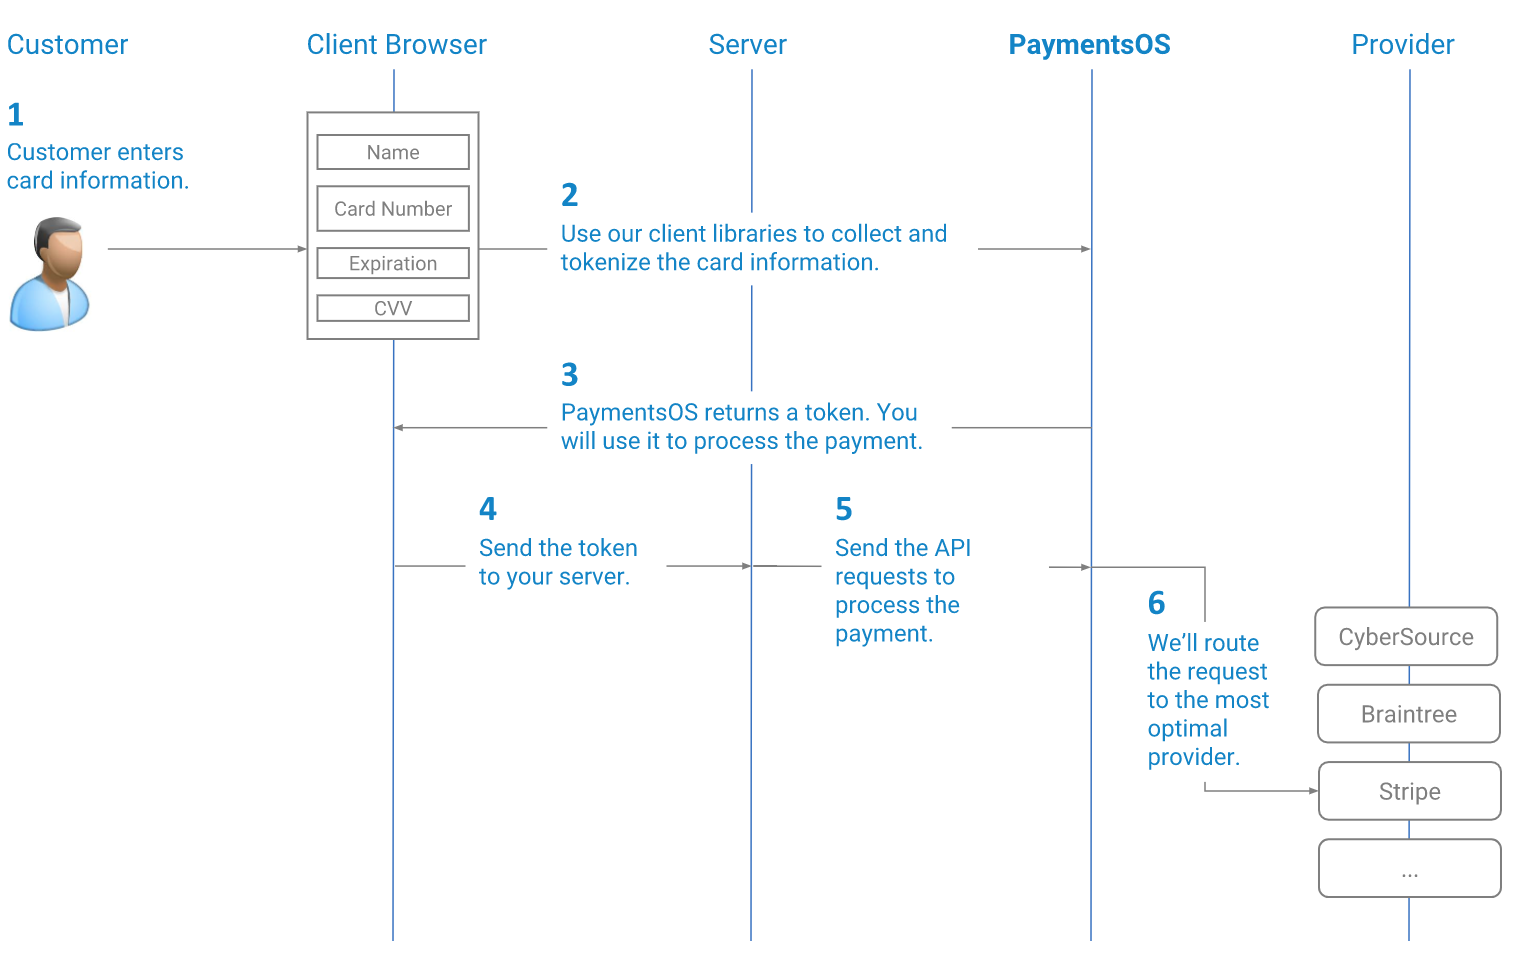
At a high level, processing a payment with PaymentsOS involves the following sequence of events:

PaymentsOS provides a 3D Secure Authentication service that handles the entire 3D Secure authentication flow, with support for both 3D Secure version 1 and version 2.
3DS authentication, risk management and network tokens.