PayU Single Platform
API Version
Minimum required API version: 1.1.0
The following features require an API version higher than the minimum:
- 3DS 2.0 Internal requires API version 1.3.0
- 3DS 2.0 External requires API version 1.3.0
Payment Methods
The following table lists all supported payment methods.
| Payment Method | Payment Method Type |
|---|---|
| Apple Pay - Encrypted Token | eWallet |
| BLIK - Authorization Code | eWallet |
| BLIK - Billing Agreement | eWallet |
| Google Pay | eWallet |
| MAESTRO | Cards |
| MASTERCARD | Cards |
| Payment Wall | Bank Transfer |
| PBL Pay by Link | Bank Transfer |
| VISA | Cards |
Currencies
BGN, CHF, CZK, DKK, EUR, GBP, HRK, HUF, NOK, PLN, RON, RUB, SEK, UAH, USD
Bank transfer only supports CZK, EUR and PLN.
Features
The following table provides an overview of all supported and non-supported features.
| Feature | Supported | Notes |
|---|---|---|
 to authorize a card using 3DSecure, then you can pass the 3DS data returned from the MPI in your PaymentsOS transaction requests") 3DS 2.0 External 3DS 2.0 External | Yes | |
| 3DS 2.0 PaymentsOS-handled | No | |
| 3DS 2.0 PaymentsOS-handled | No | |
| 3DS 2.0 Provider-handled | Yes | Supported flow type: Provider-handled Flow. For more information, see 3DS 2 Provider-handled Flow. |
| 3DS 2.0 Self-handled | No | |
| Installments | No | |
| Level 2 and 3 Data | No | |
| Multi-seller Payments | Yes | |
| Network Tokens | Yes | |
| Payment Facilitator | Yes | |
| PayU Risk | No | |
| Pre-authorization | No | |
| Retrieve Supported Payment Methods | Yes | |
| Retrieve Supported Plans | No | |
| Statement Soft Descriptor | Yes | |
| Stored Credentials Flag | Yes | Contact your account manager to enable this feature for your account. |
| Transaction Processing without CVV | Yes |
Requests
The following table lists all supported requests. Use the bodybuilder to create a sample request body for each request type.
| Request | Partial/Multiple | Mode | Notes |
|---|---|---|---|
| Authorize | Partial and multiple are not supported | Asynchronous |
|
| Capture | Partial is supported | Asynchronous |
|
| Refund | Both partial and multiple are supported | Asynchronous |
|
| Void | Not Applicable | Asynchronous |
| Request | Partial/Multiple | Mode | Notes |
|---|---|---|---|
| Authorize | Partial and multiple are not supported | Asynchronous |
|
| Capture | Partial and multiple are not supported | Asynchronous | The hold on the funds will be released if you did not capture the funds within 10 days of the Authorize request. |
| Refund | Partial is supported | Asynchronous | |
| Void | Not Applicable | Asynchronous | Only supported if Automatic Collection is disabled. |
| Request | Partial/Multiple | Mode | Notes |
|---|---|---|---|
| Authorize | Partial and multiple are not supported | Asynchronous | |
| Capture | Partial and multiple are not supported | Asynchronous | |
| Void | Not Applicable | Asynchronous | Only supported if Automatic Collection is disabled. |
Setup Procedures
The following table lists the setup procedures that are specific to this provider.
| Configuration | Required/Optional |
|---|---|
In the PaymentsOS Control Center, configure the following credentials:
For your live credentials, login to your PayU Single Platform Account. In the PayU Biz Panel, in the Online payments tab, click > My Shops > click POS of the relevant shop > click the name under POS > CONFIGURATION KEYS. | Required |
In the PaymentsOS Control Center, create webhooks to be notified when a transaction changes its status. The payment flows for PayU Single Platform are asynchronous, which return responses with a pendingstatus. | Required |
| In your PayU Single Platform account, Automatic Collection can be enabled or disabled. In both cases, an Authorization flow must be used (and not Capture). An on/off option for Automatic Collection can be set in your PayU Single Platform account for the relevant payment methods. Should you opt to disable Automatic Collection in your account, you will allow for correct processing of Authorization requests, and keep PaymentsOS in sync with the PayU system. | Required |
| In your PayU Single Platform account, configure the currencies you want to use in transactions. You can use your PayU Single Platform account panel for PLN settings creation. For other currencies, contact your Sales representative for support.(only applicable to the credit card and payment_wall payment methods). | Required |
| In your PayU Single Platform account, enable Tokenization for credit card payment methods. Contact PayU Single Platform support for assistance. | Required |
| In your PayU Single Platform account, disable the CVV check if desired. Contact PayU Single Platform support for assistance. | Optional |
| To use partial captures, make sure pre-authorization and partial capture functionality is enabled in your PayU Single Platform account. Contact PayU Single Platform support for assistance. | Optional |
Integration Procedures
The following sections list the integration procedures that are specific to this provider.
Redirecting your customer for Asynchronous Payment Flows
You’ll need to redirect your customer for the following payment methods:
- Credit card payments that include 3D Secure
- PBL bank transfers
- payment_wall payments
When you send a post authorization request, we will return an authorization resource containing an authorization.redirection.url, and a status of pending. Redirect your customer to this URL, so that they can authenticate themselves and complete the payment flow:
- For credit card payment methods, the redirection is to a 3D Secure site.
- For the PBL payment method, the redirection is to your customer’s bank authentication site.
- For the payment_wall payment method, the redirection is to a PayU Single Platform hosted page, where your customer can select a payment method.
Once the authentication / payment method selection process at the provider is done, we’ll redirect your customer’s browser back to your site, using the merchant_site_url (that you provided in the post authorization). We’ve included the following URL parameters in the merchant_site_url, to provide you with the context of the page that you’ll need to load: payment_id, authorization_id, and status (of the authorization). Here’s an example:
<merchant_site_url>
  ?payment_id=dd1fbe34-4636-4a61-8cb1-27ac8a175284
  &authorization_id=aec1c306-e0f7-452b-8fb5-5b34489e9d10
  &status=Pending
Note
The status of your authorization request may still bepending when we redirect your customer back to your site (while the provider is processing the request).
If you do not pass a merchant_site_url, the user will not be able to complete the 3DS authentication flow. The response data of the Create Authorization request will indicate this in the additional_details.error field:
{
  "additional_details": {
    "error": "The transaction requires 3DS authentication, but cannot be completed as the merchant_site_url was not provided"
  }
  ...
}
Note
If the user could not complete the 3DS authentication flow, the transaction will remain in statusPending. After 5 days, the transaction will transition to a status of Failed.
Handling a 3D Secure Challenge in an iframe
In the event that the shopper must complete a challenge step as part of a 3DS flow, you may have the option to show the challenge screen in an iframe. If this option is available to you, you will receive a provider_data.additional_information.iframe_allowed value of true in the response of the Create Authorization request:
{
  "provider_data": {
    ...
    "additional_information": {
      ...
      "iframe_allowed": "true"
    }
  }
}
Let’s start by looking at an example of how to create and style the iframe. We’ll then proceed to see how you listen to a message that allows you to interact with the iframe.
Showing and Styling the iframe
Here’s an example for showing an iframe in a modal window:
<div class="modal">
     <div class="modal-content">
         <iframe src="redirectUri">

         </iframe>
     </div>
</div>
It is best not to set a sandbox attribute for the iframe, as it cannot be guaranteed that the authentication performed by the issuers will always work. However, if you decide to use a sandboxed iframe, this is the necessary minimum you need to allow:
<iframe sandbox="allow-forms allow-scripts allow-same-origin" src="redirectUri">

</iframe>
Centering the iframe for Desktop Screens
If you want to center the iframe on a desktop screen, you can use the following CSS:
.modal {
    display: none; /* Hidden by default */
    position: fixed; /* Stay in place */
    z-index: 1; /* Sit on top */
    left: 0;
    top: 0;
    width: 100%; /* Full width */
    height: 100%; /* Full height */
    background-color: rgb(0,0,0); /* Fallback color */
    background-color: rgba(0,0,0,0.4); /* Black w/ opacity */
    }
.modal-content {
    background-color: #fefefe;
    margin: auto; /* Center the content */
    border: 1px solid #888;
    height: 520px; /* Max height of authentication page content, incl. header */
    width: 600px; /* Max width of authentication page content */
}
iframe {
    border-style: hidden;
    height: 100%;
    width: 600px; /* Max width of authentication page content, incl. header */
    margin: auto;
 }
Making the iframe Responsive for Mobile Devices
Enable the iframe content to be responsive by adding the below tag in the
of your HTML document:<meta name="viewport" content="width=device-width, initial-scale=1.0, maximum-scale=1.0, user-scalable=no">
You should override the previous CSS declarations for smaller screens:
@media (max-width: 599px)  {
    .modal-content {
        width: 100%;
        margin: 0;
        /* Center vertically */
        position: absolute;
        top: 50%;
        -ms-transform: translateY(-50%);
        transform: translateY(-50%);
    }
    iframe {
        width: 100%; /* Display in full available width */
    }
}
Listening to Messages from the iframe
To listen to messages from the iframe, add an event listener that listens to the message event and define the function to call when the event occurs, like so:
window.addEventListener('message', handleMessage, false);
function handleMessage(msg) {
    if (msg.origin === 'https://secure.payu.com') {
    switch (msg.data) {
        case ('DISPLAY_FRAME'):
            // reveal the iframe if it is hidden
            break;
        case ('AUTHENTICATION_SUCCESSFUL'):
            // close the iframe, do other specific stuff
            break;
        case ('AUTHENTICATION_CANCELED'):
            // close the iframe, do other specific stuff
            break;
    }
}
Notice that the iframe may post messages to its parent window using the values in the message.data property. The following table lists those values and suggests how you may act upon them:
| Value | Possible action |
|---|---|
DISPLAY_FRAME |
Reveal the iframe if it was hidden. Note: The DISPLAY_FRAME message may occur twice in the event of a 3DS 2 Challenge followed by CVV form. |
AUTHENTICATION_SUCCESSFUL |
Authentication has been finished, close the iframe. Note: SUCCESSFUL means that no errors occurred; it does not indicate the business outcome (that is, whether the cardholder has been authenticated). |
AUTHENTICATION_CANCELED |
Errors occurred, close the iframe. |
Two caveats:
- There are several ways to handle the above cases in detail. For example, you can close the iframe only, but not the modal window and display some message in it. You may also close both the modal window and iframe and reload the page to show some neutral information, or show a preloader and await the authorization result and display it immediately after it is known.
- In the event of
AUTHENTICATION_SUCCESSFUL, you should wait for the authorization result before showing any information about the payment status. To obtain the result, wait for a notification or retrieve the order details.
Parsing the Response of the Retrieve Supported Payment Methods Request
When building your checkout page, you can choose to invoke the Retrieve Supported Payment Methods request to retrieve a list of supported payment methods. The response will have a structure similar to the following:
...
{
 "supported_payment_methods": [
    {
      "display_name": "Płacę później",
      "vendor": "dp",
      "source_type": "bank_transfer",
      "status": "ENABLED",
      "logo_url": "https://static.payu.com/images/mobile/logos/pbl_dp.png"
    },
    {
      "display_name": "BLIK",
      "vendor": "blik",
      "source_type": "bank_transfer",
      "status": "ENABLED",
      "logo_url": "https://static.payu.com/images/mobile/logos/pbl_blik.png"
    }
    ...
 ],
 ...
}
When creating a transaction flow for PBL and Payment Wall, you are required to pass in the bank_name in the request body of the Create Authorization request. Contrary to what you would expect, the bank_name corresponds to the vendor field returned in the response data of the Retrieve Supported Payment Methods request.
Here’s a sample Create Authorization request for a bank transfer using the PBL payment method. Notice that bank_name is populated with the value of the vendor field you obtained when invoking the Retrieve Supported Payment Methods request. You should specify a bank_name value, regardless of the source_type returned by the Retrieve Supported Payment Methods request.
{
  "merchant_site_url": "http://www.abc.com/return-url",
  "payment_method": {
    "source_type": "bank_transfer",
    "type": "untokenized",
    "vendor": "PBL",
    "additional_details": {
      "bank_name": "blik", // This is the vendor
      "language": "pl"
    }
  },
  "reconciliation_id": "40762342"
}
Integrating Apple Pay
Note
Make sure your account with PayU Single Platform has been configured to support Apple Pay.Integrating Apple Pay involves the following:
-
Configuring your Apple Developer Account and adding Apple Pay to your checkout page.
-
Integrating Apple Pay with your PaymentsOS transaction flows.
Configuring your Apple Developer Account
Before following the procedures below, contact us to request a CSR (Certificate Signing Request) certificate. Apple requires this certificate. Then proceed as follows:
-
Configure your Apple Developer Account for Apple Pay. For help, see this Configuring your Environment on the Apple developer site. Note that you will be required to upload the CSR (Certificate Signing Request) certificate as part of the configuration procedures.
-
When setting up your account in step 1, you will generate a apple_pay.cer file. Send us this file so that we can store it in your account.
-
Integrate Apple Pay in your checkout page using Apple’s Javascript API, as explained on the Apple developer site.
Now proceed to integrate Apple Pay with PaymentsOS.
Integrating Apple Pay with PaymentsOS
Once your Apple Developer account is setup and you’ve added Apple Pay to your checkout page, you are ready to integrate Apple Pay with PaymentsOS.
When the customer chooses to pay with Apple Pay, Apple will return a token to your web page. Here’s a sample token:
{
  "version": "EC_v1",
  "data": "DjI8Ez7nPhVo742aGEzABz/TfxCPt9LSdf2/h+0xIgVJbi3fQqd4lv3ogoTI3SQ7vZrDAWI8g2lbd5sflXBHc0z+wSeybsCcqZB3n1edRFXU7+6DYmdhFFWWCejwUc6XZWmsSaVNEQf+Kc0SeYrj8Eskdapj8bYX/QXxXSPqS4IKSjB+f3O0gUXSq7LK/jA9dl+BbWW0l3gXERU6n5rcYndO5rnjiwNUpnm7EMIMfNU+IPbsubpL82kbL2MdMJB1grel03J4JKld6G0pFSmjR2mF/xBY/yKkADRhoQkVlDRicuKVMpdRXXbIQjw/yRkLv/u8iy1wXI5YmEBB+W4QpPYsuxys94gMPaKhcaEK/OaT099aFrNBezbuLMTcTzbhXOpPwWn9pkAK0eZNOQ==",
  "signature": "MIAGCSqGSIb3DQEHAqCAMIACAQExDzANBglghkgBZQMEAgEFADCABgkqhkiG9w0BBwEAAKCAMIID5jCCA4ugAwIBAgIIaGD2mdnMpw8wCgYIKoZIzj0EAwIwejEuMCwGA1UEAwwlQXBwbGUgQXBwbGljYXRpb24gSW50ZWdyYXRpb24gQ0EgLSBHMzEmMCQGA1UECwwdQXBwbGUgQ2VydGlmaWNhdGlvbiBBdXRob3JpdHkxEzARBgNVBAoMCkFwcGxlIEluYy4xCzAJBgNVBAYTAlVTMB4XDTE2MDYwMzE4MTY0MFoXDTIxMDYwMjE4MTY0MFowYjEoMCYGA1UEAwwfZWNjLXNtcC1icm9rZXItc2lnbl9VQzQtU0FOREJPWDEUMBIGA1UECwwLaU9TIFN5c3RlbXMxEzARBgNVBAoMCkFwcGxlIEluYy4xCzAJBgNVBAYTAlVTMFkwEwYHKoZIzj0CAQYIKoZIzj0DAQcDQgAEgjD9q8Oc914gLFDZm0US5jfiqQHdbLPgsc1LUmeY+M9OvegaJajCHkwz3c6OKpbC9q+hkwNFxOh6RCbOlRsSlaOCAhEwggINMEUGCCsGAQUFBwEBBDkwNzA1BggrBgEFBQcwAYYpaHR0cDovL29jc3AuYXBwbGUuY29tL29jc3AwNC1hcHBsZWFpY2EzMDIwHQYDVR0OBBYEFAIkMAua7u1GMZekplopnkJxghxFMAwGA1UdEwEB...",
  "header": {
    "ephemeralPublicKey": "MFkwEwYHKoZIzj0CAQYIKoZIzj0DAQcDQgAEZMzlWOx8Xo8pXlOvzYONy+gvUy59ZOeuCov3kzc7fESczZTyvmA9dU9AdVMFaYyfCXlMG5oedi3Wy4yubqfxtg==",
    "publicKeyHash": "xrJqUFO2jN5edGS8iETkfNXtwqnwSqRUUrQJBysFpZ8=",
    "transactionId": "aa0b77fbb4f64cd3e5deef65177938b2d836e0d7d93d58000d8d54cfca19ae13"
  }
}
Once you’ve obtained a network token through Apple Pay, the payload needs to be passed ‘as is’ (that is, without decryption), after which we extract the network token for you.
You pass the token fields as key-value pairs under payment_method.additional_details in the Create Authorization request. Make sure to also include all fields from the token header object using key names as shown in the example below (include just the fields, not the entire object). Here’s a sample request body:
{
  "payment_method": {
    "source_type": "ewallet",
    "type": "untokenized",
    "vendor": "applepay",
    "additional_details": {
      "data": "DjI8Ez7nPhVo742aGEzABz/TfxCPt9LSdf2/h+0xIgVJbi3fQqd4lv3ogoTI3SQ7vZrDAWI8g2lbd5sflXBHc0z+wSeybsCcqZB3n1edRFXU7+6DYmdhFFWWCejwUc6XZWmsSaVNEQf+Kc0SeYrj8Eskdapj8bYX/QXxXSPqS4IKSjB+f3O0gUXSq7LK/jA9dl+BbWW0l3gXERU6n5rcYndO5rnji...",
      "ephemeralPublicKey": "MFkwEwYHKoZIzj0CAQYIKoZIzj0DAQcDQgAEZMzlWOx8Xo8pXl...",
      "publicKeyHash": "xrJqUFO2jN5edGS8iETkfNXtwqnwSqRUUrQJBysFpZ8=",
      "signature": "MIAGCSqGSIb3DQEHAqCAMIACAQExDzANBglghkgBZQMEAgEFADCABgkqhkiG9w0BBwEAAKCAMIID5j...",
      "transactionId": "aa0b77fbb4f64cd3e5deef65177938b2d836e0d7d93d58000d8d54cfca19ae13",
      "version": "EC_v1"
    }
  }
}
Of course, you can use the BodyBuilder to generate sample requests (make sure to choose the eWallet payment type).
You can now complete the transaction by invoking the Create Capture request.
Integrating Google Pay™
Note
Make sure your account with PayU Single Platform has been configured to support Google Pay.Integrating Google Pay involves the following:
-
Adding Google Pay to your checkout page.
-
Integrating Google Pay with your PaymentsOS transaction flows.
Adding Google Pay to your Checkout Page
Start by adding Google Pay to your checkout page, as explained in the Google developer documentation. For guidelines that detail how to reference the Google Pay brand within your website, see the brand guidelines published on the Google developer documentation site.
Now proceed to integrate Google Pay with PaymentsOS.
Integrating Google Pay with PaymentsOS
Once you’ve added Google Pay to your checkout page, you are ready to integrate Google Pay with PaymentsOS.
When the customer chooses to pay with Google Pay, Google will return a token to your web page. Here’s a sample token:
{
  "signature": "MEYCIQCbOYSGLvmt5mfJROZPJ/KiRhNKzQJfgwL1YcGeC1LhLQIhAOVQ5PdCbmHasSDmaWDNyujbKzvWC34ZpSB+LNcGQfh2",
  "protocolVersion": "ECv1",
  "signedMessage": "{\"encryptedMessage\":\"ORlKvJUgFcdSkRwdS3p9qa9iHo2332SiPUWYhV50bvwwFJFmRwGZap9fRTHAZyz5b45QFODB5VEe4b7xfpj6880I5gzFye9kfRB97pfDIP5HTxUt6G2JoPYxLClvU/h681giQT9l/FkpNmce6nHk3QpPWt0zT10HkYXSrQQ40RkReRelJ/5n6iylKy+/kJE2kxpwoc0pkN/JQp9LyfxOeDXfcipf8Wqc8GM/mRd4sh6TVtZ1cFuEgZ2+xnAaN+L/ad55LODV5UClUp1IYorJxeO+yqykvDxniTz4uGFmF2faJZZujBEXJ8iVEoXTwnQgYR19nyIPEiZM2NLGB7THDlYKgb2L42AJ5jtUHzKgiTzF9+RUChf6s5hb0YB45hSLdBqGlFyC7vCLlLE5XjKiuoiNXd416bElauRdl/kaKxLdb+5cBobbEvGmKr00Kp8zBA\\u003d\\u003d\",\"ephemeralPublicKey\":\"BLbp7luOTrmE9eqGZ0JvDSOY39yDWcff/qFxhexV6CKQjgQ/iSmB3KT5a8sjMH/VFHsKTkFDwF5Rh8OmSMSthX4\\u003d\",\"tag\":\"bs205RuNTDh0bfyTDvZ1K3wHCXa4OXLOrQh/sGkR4aY\\u003d\"}"
}
Now pass the token’s fields as key-value pairs in the payment_method.additional_details field of the Create Authorization request. Here’s a sample request body:
{
  "payment_method": {
    "source_type": "ewallet",
    "type": "untokenized",
    "vendor": "googlepay",
    "additional_details": {
      "signature": "MEYCIQCbOYSGLvmt5mfJROZPJ/KiRhNKzQJfgwL1YcGeC1LhLQIhAOVQ5PdCbmHasSDmaWDNyujbKzvWC34ZpSB+LNcGQfh2",
      "protocol_version": "ECv1",
      "signed_message": "{\"encryptedMessage\":\"ORlKvJUgFcdSkRwdS3p9qa9iHo2332SiPUWYhV50bvwwFJFmRwGZap9fRTHAZyz5b45QFODB5VEe4b7xfpj6880I5gzFye9kfRB97pfDIP5HTxUt6G2JoPYxLClvU/h681giQT9l/FkpNmce6nHk3QpPWt0zT10HkYXSrQQ40RkReRelJ/5n6iylKy+/kJE2kxpwoc0pkN/JQp9LyfxOeDXfcipf8Wqc8GM/mRd4sh6TVtZ1cFuEgZ2+xnAaN+L/ad55LODV5UClUp1IYorJxeO+yqykvDxniTz4uGFmF2faJZZujBEXJ8iVEoXTwnQgYR19nyIPEiZM2NLGB7THDlYKgb2L42AJ5jtUHzKgiTzF9+RUChf6s5hb0YB45hSLdBqGlFyC7vCLlLE5XjKiuoiNXd416bElauRdl/kaKxLdb+5cBobbEvGmKr00Kp8zBA\\u003d\\u003d\",\"ephemeralPublicKey\":\"BLbp7luOTrmE9eqGZ0JvDSOY39yDWcff/qFxhexV6CKQjgQ/iSmB3KT5a8sjMH/VFHsKTkFDwF5Rh8OmSMSthX4\\u003d\",\"tag\":\"bs205RuNTDh0bfyTDvZ1K3wHCXa4OXLOrQh/sGkR4aY\\u003d\"}"
    }
  }
}
Of course, you can use the BodyBuilder to generate sample requests (make sure to choose the eWallet payment type).
You can now complete the transaction by invoking the Create Capture request.
Integrating BLIK
When integrating BLIK in your payment flow, you have two options to choose from:
-
Integrating BLIK with a re-direct to the BLIK authentication page: You redirect your customers to the BLIK authentication page, where they enter their BLIK authorization code and complete the transaction.
-
Integrating BLIK within your checkout page: You allow customers to enter their BLIK authorization code directly in your checkout page, without redirecting them to the BLIK authentication page. When choosing this option, you can also offer your customers to associate a BLIK token with their account. With a BLIK token storing the customers' payment information, customers can pay with a single ‘click’ and won’t need to enter their authorization code each time they want to complete a payment.
BLIK Amount Limitation
BLIK transactions are limited to a maximum amount of PLN 9999.99. Note that sending requests exceeding this amount will result in an error.Integrating BLIK with a re-direct to the BLIK authentication page
If desired, you can integrate BLIK by redirecting your customers to the BLIK authentication page for entering their BLIK authorization code and completing the transaction. To do so, pass the following payment_method object in the body of the Create Authorization request. Notice that the payment_method object must also include an additional_details.bank_name field, with a value of blik.
{
  "payment_method": {
    "source_type": "ewallet",
    "type": "untokenized",
    "vendor": "blik",
    "additional_details": {
      "bank_name": "blik"
    }
  }
}
Integrating BLIK Within Your Checkout Page
Rather than redirecting your customers to the BLIK authentication page for entering their authorization code, you can also process the BLIK authorization code directly in your checkout page. Simply prompt your customers for their authorization code and pass it in the payment_method.additional_details.authorization_code field of the Create Authorization request. You must also pass a payment_method.additional_details.bank_name field with a value of BLIK_AUTHORIZATION_CODE.
{
  "payment_method": {
    "source_type": "ewallet",
    "type": "untokenized",
    "vendor": "blik",
    "additional_details": {
      "authorization_code":"777123",
      "bank_name": "BLIK_AUTHORIZATION_CODE"
    }
  }
}
One-Click Payments Using a BLIK Token
To offer your shoppers optimized checkout experience, you can associate a BLIK token with their account. That way, they’ll be able to pay with a single ‘click’ in all subsequent transactions— without having to enter their BLIK authorization code every time.
As a starting point, you will need to create an account for your shopper by invoking the Create a Customer request and including the customer_reference and email as mandatory fields.
After completing this step, you will now have a customer_id associated with your shopper’s account. You will need to pass this customer_id in all future Create Payment requests associated with that shopper.
Enabling Payment with a BLIK Token
When your shopper wishes to pay with BLIK, you will need to check whether a BLIK token is associated with their account or not (you will do so by invoking the GET Customer request).
From there, the flow will diverge to either Flow A or Flow B, depending on the BLIK token availability.
Flow A: Associating a Shopper with a New BLIK Token
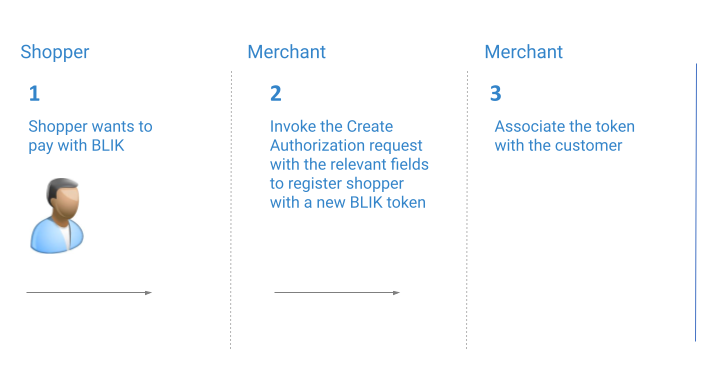
To associate your shopper with a new BLIK token:
- Include the following fields in the Create Authorization request:
{
  "payment_method"{
    "source_type":"ewallet",
    "type":"untokenized",
    "vendor":"blik",
    "additional_details":{
      "authorization_code":"<Blik code>",
      "bank_name":"BLIK_AUTHORIZATION_CODE",
      "register":"true"
    }
  }
}
Notice that as indicated in the request above, if you wish to give the shopper the ability to pay with ‘BLIK One-click Payments’, the payment_method.additional_details.register field will need to be set to true. The payment_method.additional_details.authorization_code will need to include the authorization code the shopper received from BLIK, and the payment_method.additional_details.bank_name will need to be set to BLIK_AUTHORIZATION_CODE.
- In the authorization response, fetch the BLIK token from
provider_data.additional_information.blik_payment_method_token. Once the token state becomesactive, you will need to Associate the token with the shopper.
Note about Token Status
Until the shopper approves the use of their information for future ‘One-click payments’, the Enterprise-platform token (representing the BLIK token) will remain with apending state. The token state will change to active once approval is received. Only a token with an active status can be saved. The shopper’s approval is usually received momentarily, but make sure to repeat the process after a couple of minutes if it initially fails.
Flow B: Shopper with an Existing BLIK Token
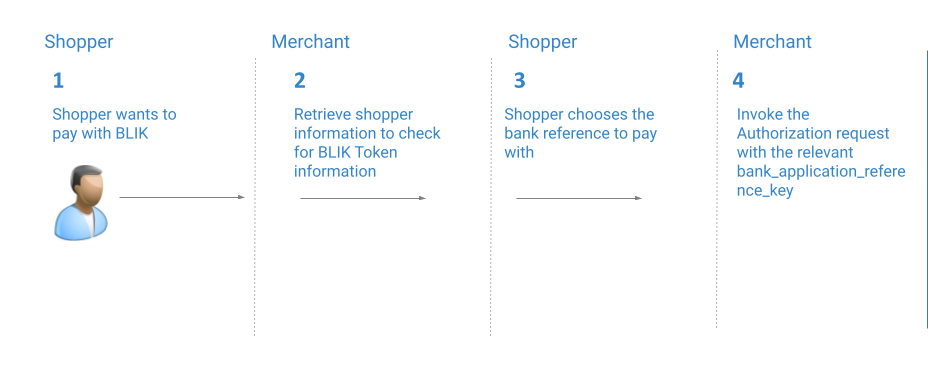
To process payments for shoppers with an active BLIK token:
- A shopper with an existing BLIK token will have their bank references listed within the token under
payment_methods.additional_details. The object will include the following fields:
{
  "payment_methods":{
    "type":"tokenized",
    "token":"f9e66633-03ee-4da3-94e8-90e0fd6a09a3",
    "token_type":"billing_agreement",
    "additional_details":{
      "bank_application_reference_key<n>":"<app_key>",
      "bank_application_reference_label<n>":"<app_label>"
    }
  }
}
Note about Bank References
Thebank_application_reference_key is the numerical identifier (passed in the authorization request) representing the shopper’s bank reference, whereas the bank_application_reference_label is the label the shopper sees at checkout. You will need to map the relevant bank_application_reference_key to its corresponding bank_application_reference_label.
- Invoke the Create Authorization including the relevant
bank_application_reference_key:
{
  "payment_method": {
    "type": "tokenized",
    "token": "your token"
  },
  "provider_specific_data": {
      "payu_poland": {
        "additional_details": {
          "bank_application_reference_key": "123456"
        }
      }
  }
}
Provider Specific Response Codes
The following response codes are specific to PayU Single Platform.
| Error Code | Description |
|---|---|
| ERROR_VALUE_INVALID, OPENPAYU_PAYMENT_CREATE_BLOCKED _CHECKOUT_PAY_METHOD |
Chosen payment method is currently unavailable. |
| SSD | In the event that an exempt from 3DS authentication was requested and the request is evaluated by an issuer that only supports 3DS1, then you will receive a soft decline code (SSD). The error response code and description will indicate the reasons for the decline. You should then retry the authorization, passing in a three_d_secure_attributes.internal.challenge_indicator value of 4 (Challenge requested (Mandate)) in the Create Authorization request. |
Testing
This section list the test card numbers you can use for testing your integration and outlines the test procedures for bank transfer payment methods.
Testing with Credit Card Payment Methods
You can use the following test cards for testing. All test cards support authentication by means of 3DS 2 protocol and the result is, unless stated otherwise, a successful frictionless authentication. Note that due to SCA/PSD2 requirements, test cards with default 3DS result cannot be used to store card information.
| Number | Month | Year | CVV | 3DS result | Mastercard installments | Behavior |
|---|---|---|---|---|---|---|
| 4444333322221111 | 12 | 29 | 123 | default | no | Positive authorization |
| 5434021016824014 | 12 | 29 | 123 | default | yes | Positive authorization. Pay in installments with Mastercard in VARYING_NUMBER_OF_OPTIONS options format. |
| 5598614816563766 | 12 | 29 | 123 | default | yes | Positive authorization. Pay in installments with Mastercard in VARYING_NUMBER_OF_OPTIONS options format. |
| 5099802211165618 | 12 | 29 | 123 | default | no | Positive authorization. CVV is not required in single click payments (PayU | Express) |
| 4012001037141112 | 12 | 29 | 123 | default | no | Positive authorization |
| 5100052384536891 | 12 | 29 | 123 | default | no | Positive authorization |
| 5150030090050083 | 12 | 29 | 123 | default | no | Negative authorization |
| 4012001007002005 | 12 | 29 | 123 | default | no | Negative authorization |
| 5000105018126595 | 12 | 29 | 123 | default | no | Negative authorization |
| 4000398284360 | 12 | 29 | 123 | default | no | Negative authorization |
| 4245757666349685 | 12 | 29 | 123 | challenge required | no | Positive authorization |
| 5150030090350186 | 12 | 29 | 123 | 3DS Method required and then successful frictionless | no | Positive authorization |
| 4012001037141120 | 12 | 29 | 123 | 3DS Method and challenge required | no | Positive authorization |
| 5100052384536834 | 12 | 29 | 123 | challenge params if sdk object sent in OrderCreateRequest | no | Positive authorization |
| 5100052384536818 | 02 | 32 | 123 | challenge required / if no 3DS is used, returns soft decline (SSD) | no | Positive authorization |
| 5100052384536826 | 12 | 29 | 123 | frictionless positive authentication | no | Positive authorization |
| 5521455186577727 | 12 | 29 | 123 | frictionless negative authentication | no | no authorization (authentication fails) |
| 5405860937270285 | 12 | 29 | 123 | default | no | 50% chance for successful authorization |
| 4532598021104999 | 12 | 29 | 123 | default | no | successful authorization only if amount below 1000 minor units of given currency |
You can use the following public sandbox test POSes without registering:
| POS Currency | POS ID | secret_key | second_key | ||
|---|---|---|---|---|---|
| POS_PLN | 356102 | 67c13e1355d7694e6c7a3f22d1cc8bea | 7d73d76c776bcee7245d3459aebccf62 | ||
| POS_EUR | 356103 | cf73c2810d8769b1b3ff243464dc5429 | e90905cc04234967e969da988589d0ef | ||
| POS_USD | 356104 | 60566c3d8a4d7771ae8f2ec10b8b74c6 | 7947b03b6d5cf08c82da2778f44a519b | ||
| POS_SEK | 356105 | 7ef1918c0884da716e2c27e0d72352cf | f91f7b4481a9d3d1fdc80d2ad38e3593 | ||
| POS_CZK | 356107 | a83fd674e3912acb7c5a3233f25eb3f1 | d3a369c216e12e189bb735dd317de932 |
For testing a 3DS 2 flow, use the following cards:
| Card number | Expected Response |
|---|---|
| 4245757666349685 | Required 3DS2 challenge |
| 4012001037141120 | Required 3DS method (device fingerprinting made by the issuer) and required 3DS challenge |
| 5100052384536826 | 3DS2 frictionless flow |
| 5599569327374757 | Soft decline (SSD). Expiration date: 02/2032 |
Testing with the PBL or payment_wall Payment Methods
To test an authorization request, pass the relevant value in the payment_method.additional_details.bank_name field as listed in the table below.
| Currency | Value | Bank/Payment Method |
|---|---|---|
| PLN | m |
mTransfer - mBank |
| PLN | o |
Pekao24Przelew - Bank Pekao |
| PLN | p |
Płać z iPKO |
| PLN | blik |
BLIK |
| PLN | c |
Cards (will show a PayU card payment form) |
| PLN | ap |
GooglePay |
| PLN | jp |
ApplePay |
| PLN | dpt |
Twisto |
| PLN | dpp |
PayPo |
| CZK | cs |
Česká spořitelna |
| CZK | kb |
Komerční banka |
| CZK | dpcz |
Pay Later with Twisto (Czech) |
| EUR | tatra |
Tatra banka (Slovakia only) |
| EUR | sporo |
Slovenská sporiteľňa (Slovakia only) |
| N/A | payment_wall |
Paymentwall |
BLIK Test Codes
You can use the following list of BLIK authorization codes to simulate a specific response.
| BLIK Authorization Code | Response |
|---|---|
| 200201 | Successful Authorization (With Token Registration) |
| 500500 | Failed Authorization |
| 777xxx | Successful Authorization (Without Token Registration) |
| 700701 | Expired Authorization Code |
| 700702 | Cancelled Authorization Code |
| 700703 | Used Authorization Code |
Sandbox Status Page
You can view the status of the sandbox environment on the sandbox status page.