Environment Setup
What you should already know
We assume you have already familiarized yourself with setting-up PaymentsOS and the APIs you need to invoke for executing transactions. If not, we strongly recommend you first review our Quick Start topics before proceeding with the instructions below.Integration and Testing Flow
As a best practice, take a phased approach to integrating PaymentsOS and testing your setup. The image below illustrates this, showing a workflow that spans a development, staging and production environment. Notice that the steps where testing comes into play are colored grey.
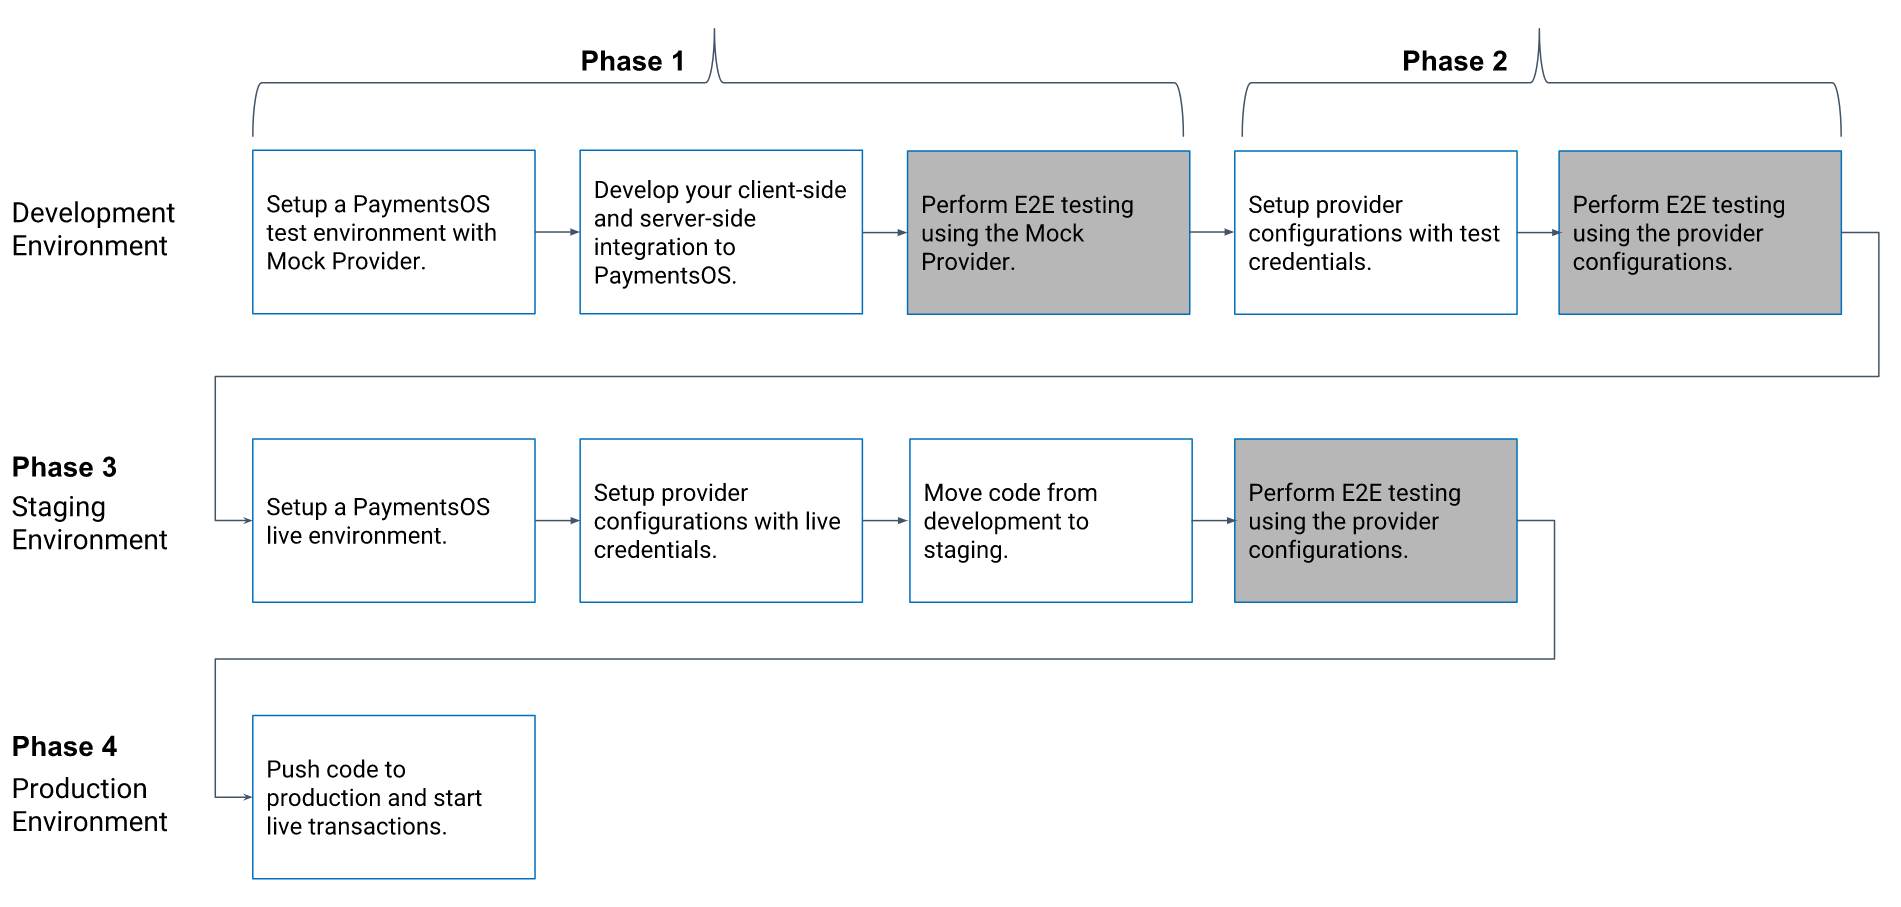
Let’s take a closer look at what the integration and testing involves in each environment.
Phase 1: Testing in a Development Environment using a Mock Provider
The first step in setting-up a development environment is to create all required configurations in the PaymentsOS test environment. We recommend you test your integration against our mock provider, since this will allow you to validate your code for invoking our APIs and handling request responses and errors.
Configuration in PaymentsOS
- Add a new provider and select Mock Provider as the provider type.
- Add a Business Unit and use the mock provider as its default provider.
Now develop client-side and server-side code for invoking the PaymentsOS APIs. Your client-side code will tokenize a user’s card information, while your server-side code will invoke all required payment flow APIs:
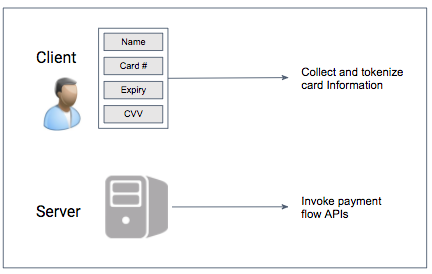
From your client-side code, route the API requests to the PaymentsOS test environment by passing in the public key from your test environment and calling POS.setEnvironment("test"). Here’s an example when using the secure fields form:
<script>

  // Set your public key. Use the key from the PaymentsOS test environment.
  POS.setPublicKey("Key from the PaymentsOS Test Environment");

  // Set your environment to "test"
  POS.setEnvironment("test");

  ...
</script>
In your server-side code, use the x-payments-os-env attribute in the API headers to route the requests to the PaymentsOS test environment. Add the app-id key to invoke the request on behalf of the test Business Unit and use the private-key from the PaymentsOS test environment:
    var request = new XMLHttpRequest();
    ...
    request.setRequestHeader('x-payments-os-env', 'test');
    request.setRequestHeader('app-id', 'com.my.test.app');
    request.setRequestHeader('private-key', 'Key from PaymentsOS Test Environment');
    ...
    curl --compressed -X POST \
      ...
      -H 'x-payments-os-env: test' \
      -H 'app-id: com.my.test.app' \
      -H 'private-key: Key from PaymentsOS Test Environment' \
      ...
Implementing Error Handling
PaymentsOS provides uniform error messages, regardless of the provider you transact against. We thus recommend you implement error handling for the error messages returned by PaymentsOS. Using the mock provider, you can simulate response errors and implement logic for handling errors if they occur.You can now run a set of test cases to validate your setup and integration.
Phase 2: Testing in a Development Environment using Test Provider Credentials
While testing against a mock provider will allow you to validate your base setup, it does not cover a real-life scenario in which transactions are routed to the providers you want to transact against. The next step is thus to test your integration using the providers you want to support.
Most providers (though not all) provide you with test API credentials that you can use to validate API requests invoked against their servers. Grab those test credentials from your provider accounts and use them to configure your providers in the PaymentsOS test environment.
Configuration in PaymentsOS
- Login to your provider account and note down your provider’s test API credentials.
- Create new provider configurations in the PaymentsOS test environment. Use test API credentials for each provider configuration.
- Change the default provider of your test Business Unit to use the provider configuration to which transactions should be routed by default.
You can now run a set of test cases to validate transactions routed to actual providers.
Phase 3: Testing in a Staging Environment Using Live Provider Credentials
Once you’ve successfully completed your tests in a development environment, you’re ready to move your setup to the staging environment. Start by setting up your configuration in the PaymentsOS live environment.
Configuration in PaymentsOS
- If not already done, activate your account. This will give you access to the PaymentsOS Live environment.
- Create your provider configurations in a PaymentsOS live environment. Use live credentials for each provider configuration.
- Create a Business Unit in the PaymentsOS live environment. Set the default provider of your Business Unit to use the provider configuration to which transactions should be routed by default.
After completing your configuration in the PaymentsOS live environment, deploy your client-side and server-side code in the staging environment.
Note that you’ll need to update your code to use your new configuration in the PaymentsOS live environment. In your client-side code, make sure to update your public key and call POS.setEnvironment("live"). Here’s an example when using the Secure Fields Form to collect and tokenize a user’s card information:
<script>

  // Update your public key. Use the key from the PaymentsOS live environment
  POS.setPublicKey("Key from the PaymentsOS Live Environment");

  // Set your environment to "live".
  POS.setEnvironment("live");

  ...
</script>
In your server-side code, set the x-payments-os-env attribute to live. Also update your private key and App ID.
    var request = new XMLHttpRequest();
    ...
    request.setRequestHeader('x-payments-os-env', 'live');
    request.setRequestHeader('app-id', 'com.my.live.app');
    request.setRequestHeader('private-key', 'Key from PaymentsOS Live Environment');
    ...
    curl --compressed -X POST \
    ...
    -H 'x-payments-os-env: live' \
    -H 'app-id: com.my.live.app' \
    -H 'private-key: Key from PaymentsOS Live Environment' \
    ...
You can now run a set of test cases to validate transactions routed to actual providers using live provider credentials.
Phase 4: Deploying to Production
Deploying to production is always exciting, as this is the moment when your efforts come to fruition! So, once you’re confident that your setup and integration is production-ready, deploy your code to the production environment and start live transactions.
Don’t forget to pop champagne and celebrate with your team!