3DS Authentication Service (Deprecated)
Deprecation Notice
This service has been deprecated. For current 3DS authentication flows see the 3DS topic.
- The 3D Secure Authentication Service is not supported for use by merchants integrating via partners connecting to PayU on their behalf.
You can use the authentication service in two ways, depending on how you integrated with PaymentsOS:
-
As part of the payment flows handled by PaymentsOS.
-
For 3D Secure authentication only.
What 3D Secure Version Will be Used?
The 3DS version that will be used is determined by the issuer processing the 3D Secure Authentication request. Theprovider_data.three_d_secure_result.three_d_secure_version field returned in the response of the 3D Secure Authentication request indicates which version was used.
Supported Schemes
The 3D Secure Authentication Service can only be used for Visa and Mastercard transactions.
Enabling the 3D Secure Authentication Service
Before you can use the 3D Secure Authentication Service, it must be enabled in your PaymentsOS account for each Business Unit processing 3D Secure transactions. Contact your account manager to enable this feature for you. After the service has been enabled in your account, you can enable the service for each Business Unit of your choice by calling the Update a Feature by Account and Business Unit request.
Using the 3D Secure Authentication Service as Part of the Payment Flows Handled by PaymentsOS
There are some important details you need to be aware of when using the 3D Secure Authentication Service. First, you must ensure that you meet all prerequisites for using the service. When those are in place, you should familiarize yourself with the specifics of the Create Authentication request and gain an understanding of how to handle its response. We’ll cover those subjects in the topics that follow, so let’s dive right in.
Prerequisites
Before implementing the 3D Secure Authentication Service, make sure the following prerequisites are met:
-
Your authentication acquirer should be registered with the card schemes.
-
Register your merchant name with all the acquirers you will use. Make sure to register the same name with each acquirer. Also make sure your acquirers registered your merchant name with the card schemes.
-
The acquirers you intend to authenticate with must be registered with the 3DS MPI provider.
Contact your acquirers for more information.
Authentication Flow Overview
The authentication flow when using the 3D Secure Authentication Service is fairly straightforward: you first Create a Payment (nothing new here) and then invoke the Create Authentication request to initiate the 3D Secure authentication flow. If the response of the request indicates that the customer does not need to be redirected to a possible 3D Secure authentication step, then you can simply proceed to authorize the transaction. However, if a 3D Secure authentication step is required, then you will need to redirect the customer to an authentication URL. This URL is used by PaymentsOS to handle the remainder of the authentication flow for you.
The following image illustrates the authentication flow.
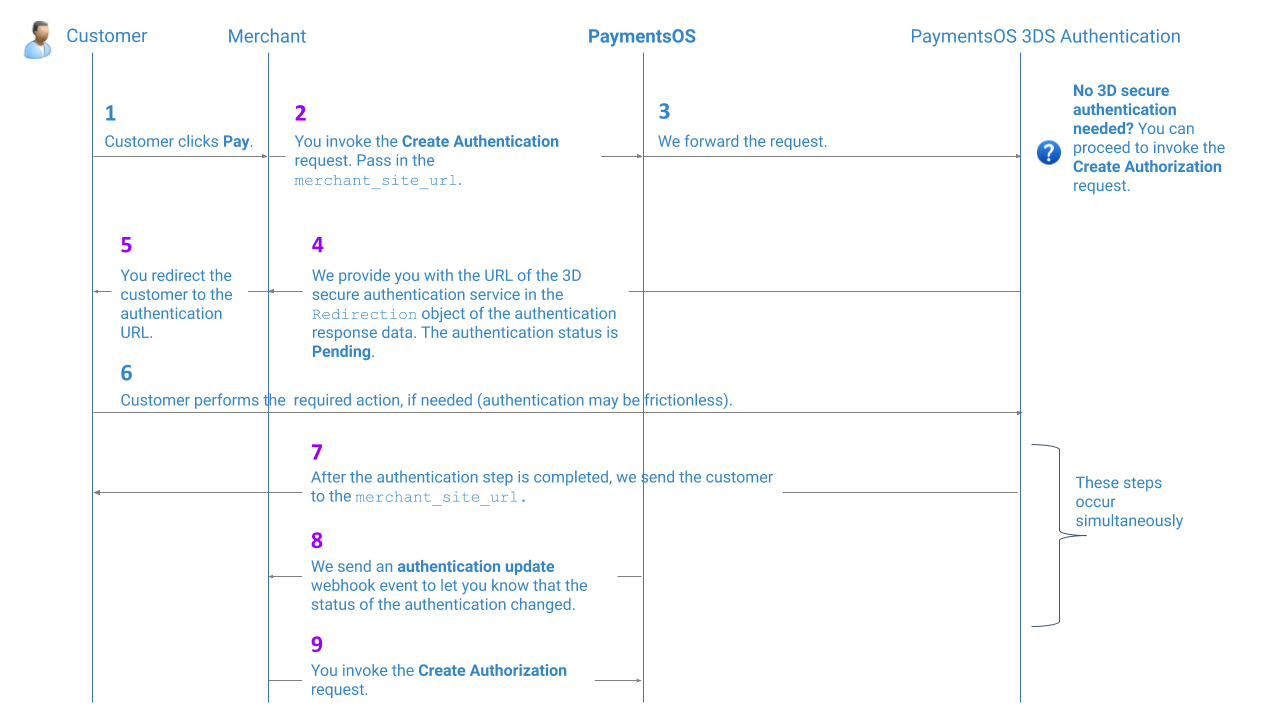
The purple numbers in the image above, indicate a step that requires additional configuration on your behalf:
-
Step 2: When invoking the Create Authentication API, pass in a
merchant_site_url. This is the URL to which customers will be redirected once they have completed the authentication process. -
Steps 4 and 5: When receiving a reply from the Create Authentication API, redirect your customers to the authentication URL for performing any action that may be required (if the authentication is frictionless, then no action is required). We provide you with the authentication URL in the
Redirectionobject of the authentication response data. -
Step 7: PaymentsOS will extend the
merchant_site_urlwith the following parameters:payment_id,authentication_idand the authenticationstatus. You can use these parameters to provide customers with additional information about the authentication. Here’s an example of additional parameters added to themerchant_site_url(notice that the status of the authentication may still bePendingwhen we redirect your customer back to your site):<merchant_site_url> ?payment_id=dd1fbe34-4636-4a61-8cb1-27ac8a175284 &authentication_id=aec1c306-e0f7-452b-8fb5-5b34489e9d10 &status=Pending -
Step 8: If the required action was completed successfully, the authentication will have transitioned to a status of Succeed (and alternatively to Failed, if the action failed). In your PaymentsOS test or live environment, make sure you configured the webhook endpoint to which PaymentsOS will send a notification informing you of a change in the authentication’s status. Read more about Webhooks for additional information.
-
Step 9: Proceed to authorize the transaction.
Invoking the 3D Secure Authentication Request
Now that you have a high-level understanding of the authentication flow, let’s go ahead and examine the 3D Secure Authentication request body. In particular, we’ll take a look at how to:
-
Pass acquirer and merchant information (this is required).
-
Exclude unneeded fields from the response data by fetching only partial 3D Secure authentication results (this is optional, although recommended).
-
Specifically request that a 3D Secure authentication step is performed (this is optional).
Passing Acquirer and Merchant Information
When using the 3D Secure Authentication Service, you must specifically indicate the name of the acquirer that will handle the 3D Secure authentication request. You do so by passing the acquirer information in the authentication_attributes.acquirer object of the Create Authentication request. Also, make sure to pass all relevant merchant information in the authentication_attributes.merchant object. Note that the authentication_attributes.merchant.merchant_name must be your business name as registered with your acquirer(s).
{
  ...
  "authentication_attributes": {
    ...
    "acquirer": {
      "acquirer_bin": "1482822",
      "acquirer_merchant_id": "272871818AZz4422",
      "acquirer_country_code": "USA"
    },
    "merchant": {
      "mcc": "8999",
      "merchant_name": "Seohs Atlovart Nhoj",
      "merchant_country_code": "USA"
    }
  }
  ...
}
Bear in mind that the information passed above will only be used in a 3D Secure 2 authentication flow.
Using the same acquirer for authenticating and authorizing the transaction
You should use the same acquirer for authorizing the transaction after the 3D secure authentication step has been completed.
Issuing banks can refuse transactions if there is a mismatch of acquirer data between the authentication and authorization requests. This is why you should indicate that the same acquirer is used for authenticating the customer and authorizing the transaction. If you are unsure about the information to pass, ask your provider to provide all relevant acquirer details.
Of course, merely passing the information about the acquirer to be used will not guarantee that the transaction is actually routed to the provider whose acquirer will be used. For this to be guaranteed, you need to configure a business routing rule. For more information, see Routing Transactions to a Provider that Uses a Specific Acquirer.
Fetching Partial 3D Secure Authentication Results
The request body of the Create Authentication request has a field called return_partial_result. This field instructs the Authentication API to either return a full result set in its response body, or to exclude fields that you do not necessarily need access to when using the 3D Secure Authentication service as part of your PaymentsOS flows. By default all fields are returned, so you should pass return_partial_result with a value of true:
{
  "payment_method": {
    ...
  },
  "merchant_site_url": "http://myurl.com",
  "additional_details": {},
  "cof_transaction_indicators": {
    ...
  },
  "return_partial_result": true, // pass a value of true
  "authentication_attributes": {
    ...
  }
}
Which fields are excluded from the response data?
When passing a
return_partial_resultfield with a value oftrue, the following fields are excluded from the response data:cavv,ds_xid,xidandthree_d_secure_server_transaction_id. PaymentsOS will process those fields ‘under the hood’ in the subsequent Create Authorization request (based on the authentication id).
Of course, you can still choose to return those fields by passing a return_partial_result field with a value of false or by omitting the return_partial_result field all together. Just take into account that returning all fields may incur additional costs.
Specifically Requesting to Perform a 3D Secure Authentication Step
You must also be aware that issuers may decide to exempt the customer from 3D Secure authentication. There are cases, however, in which you want to specifically request that a 3D Secure authentication step is performed. You can do so by passing a authentication_attributes.challenge_indicator field with a value of either 03 (Challenge requested (3DS Requestor Preference)) or 04(Challenge requested (Mandate)).
{
  "payment_method": {
    ...
  },
  "merchant_site_url": "http://myurl.com",
  "additional_details": {},
  "cof_transaction_indicators": {
    ...
  },
  "return_partial_result": true,
  "authentication_attributes": {
    "challenge_indicator": "04",
    ...
  }
}
Handling the 3D Secure Authentication Response
With all the request data in place, let’s move on to the authentication response. After invoking the Create Authentication request, keep your eye out for the data returned in the provider_data.response_code field since the response code determines your next steps.
Note
Please note that responses are part of either an Asynchronous or Synchronous flows. In synchronous flows and operations, the final status (Succeed or Failed) of a transaction is returned immediately. In asynchronous flows and operations, the transaction may first return a status of Pending before returning a final status indicating the success or failure of the transaction request. Learn more about this topic here.-
NEW:
This response indicates that the authentication transaction has been initiated. Redirect the customer to the url returned in theredirection.urlfield (you can try to show the target page in an iFrame ifredirection.iframe_allowedreturnedtrue). The remainder of the 3D Secure flow is then handled for you (including a redirection to a challenge url, if determined by the issuer). After the customer completed the authentication step and the result.status is Succeed, proceed to authorize the transaction. -
3DS_METHOD_REQUIRED: This response indicates that the authentication transaction has been initiated via the 3DS data collection flow. Redirect the customer to the url returned in the
redirection.urlfield (you can try to show the target page in an iFrame ifredirection.iframe_allowedreturnedtrue). The remainder of the 3D Secure flow is then handled for you (including a redirection to a challenge url, if determined by the issuer). After the customer completed the authentication step and theresult.statusisSucceed, proceed to authorize the transaction. -
CHALLENGE_REQUIRED: This response indicates that the customer must complete a 3D Secure authentication step. Redirect the customer to the url returned in the
redirection.urlfield (you can try to show the target page in an iFrame ifredirection.iframe_allowedreturnedtrue). The remainder of the 3D Secure flow is then handled for you (including a redirection to a challenge url, if determined by the issuer). After the customer completed the authentication step and theresult.statusisSucceed, proceed to authorize the transaction. -
NOT_REQUIRED: This response indicates that a 3D Secure authentication is not required, as in the case of a merchant-initiated transaction (MIT) or a payment initiated through a mail order/telephone order (moto). In this case, proceed to authorize the transaction. Note: Make sure that when you send the the consent transaction (this is the transaction preceding the MIT transaction), you pass a
challenge_indicatorwith a value of04so as to ensure that the consent transaction was authenticated using Strong Customer Authentication. -
AUTHORIZATION_FIRST: This response indicates that a 3D Secure authentication step may not be needed, so you can first try to authorize the transaction. Before proceeding to do so, lookup the value in the
provider_data.three_d_secure_proposed_exemptionfield since you may need it when invoking the Create Authorization request. For more information on implementing the authorization request, see Authorizing the Transaction below. -
FINISHED. The 3D Secure authentication step was completed. Proceed to authorize the transaction.
Time frame for authorizing the transaction
Authorizing the payment based on the results of the 3D Secure authentication step should be done within the time frame defined by the various card schemes.Understanding the Authentication Result Status
The authentication response returns two result statuses:
-
provider_data.three_d_secure_authentication_status: Shows the status of the authentication process, as returned by the provider handling the 3D Secure authentication request. -
result.status: Show the status of the authentication request that you invoked. This value is computed by PaymentsOS, based on both theprovider_data.three_d_secure_authentication_statusand theprovider_data.response_code. A status ofSucceedis returned if the provider response indicates that the authentication step was successfully completed, or if no 3D Secure authentication is required. The status will bePendingif theprovider_data.response_codeisCHALLENGE_REQUIRED, andFailedif the 3D Secure authentication step returned an error. You can configure a webhook notification so that you are notified the moment theresult.statuschanges.
Note
If the result.status remainsPending for more than 15 minutes, it will automatically transition to a status of Cancelled. This can happen, for example, if the user closes the browser window during the 3D Secure authentication step.
Authorizing the Transaction
The next step after invoking the 3D Secure authentication request is to invoke the Create Authorization request. Make sure both requests are invoked using the same payment ID. Also pass in the three_d_secure_attributes.external.authentication_id (you receive this identifier in the id field of the authentication request’s response data).
{
  ...
  "three_d_secure_attributes": {
  "external": {
    "authentication_id": "aec1c306-e0f7-452b-8fb5-5b34489e9d10"
  }
},
...
Recall that the provider_data.response_code received in the response data of the 3D Secure authentication request may have been AUTHORIZATION_FIRST. If you try to authorize the transaction after receiving this response code, consider the following:
-
In the Create Authorization request, pass a
three_d_secure_attributes.sca_exemptions.exemption_reasonvalue that corresponds to the value received in theprovider_data.three_d_secure_proposed_exemptionfield received in the response of the Create Authentication request (use the Bodybuilder to check whether thethree_d_secure_attributes.sca_exemptions.exemption_reasonfield is supported by the providers you are transacting against). -
If you receive a soft decline, you should invoke the Create Authentication request once again and pass a
authentication_attributes.challenge_indicatorfield with a value of04(Challenge requested (Mandate)). Note that the authorization’s decline reason is returned in theresult.categoryfield.